Plan a TAC or TAF meeting and send invitations
Written for: Authorised meeting organisers and professionals reviewing TAC/TAF work.
Choose the child and meeting structure, add professionals and an agenda, then save the meeting before sending invitations.
Save a draft while arrangements are incomplete, or schedule the meeting once the details are agreed. Invitations are a separate deliberate step after saving.
A scheduled meeting does not prove people were invited, accepted, attended or completed the agreed work. Staff review the actual response and outcome. All screenshots are fictional examples; no real meeting, Calendar entry or invitation was created.
Before you start
Section titled “Before you start”Check the school and your authority. Reading a meeting and managing it are separate permissions. The dashboard checks whether your current account may create meetings; a visible meeting or navigation link does not grant editing or case access.
Agree the purpose, people, availability, venue and appropriate information to share. Use the enrolled pupil reference when available. The fallback child-name field is for a child not yet in the school’s student records, and does not create a pupil or establish an authorised identity relationship.
1. Start with the TAC dashboard
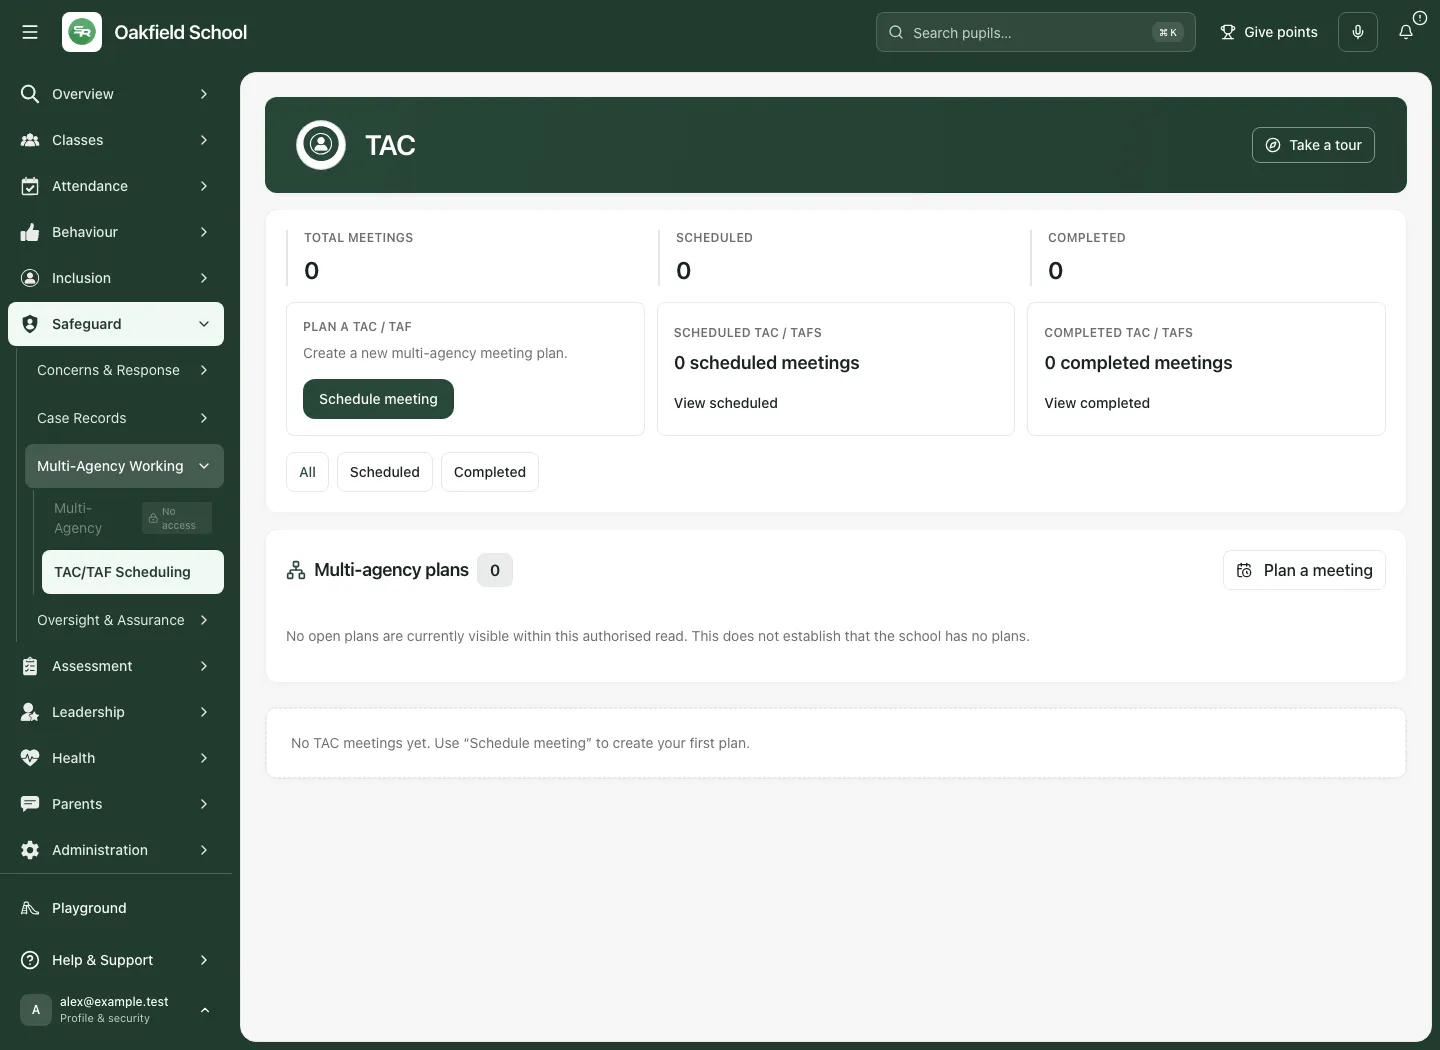
Section titled “1. Start with the TAC dashboard”- Open Safeguard → Multi-Agency Working → TAC/TAF Scheduling. The route opens the TAC dashboard.
- Read Total meetings, Scheduled and Completed. A loading or failed read is not a zero.
- Use All, Scheduled or Completed, or the Scheduled TAC / TAFs and Completed TAC / TAFs summary controls, to focus the list.
- Read each meeting’s title, child, date/time, status, mode and venue before opening it.
- Use Open runner to open the working meeting where offered, or Summary for its summary view.
- Read the Multi-agency plans card as its own bounded authorised view. No visible plans is not proof the school has no plans.
- Choose Take a tour for an introduction.
- To prepare a new meeting, choose Plan a TAC / TAF / Schedule meeting. Its accessible label is Plan a TAC or TAF meeting. If disabled, the page explains that scheduling needs permission to manage meetings.
2. Choose the child and purpose
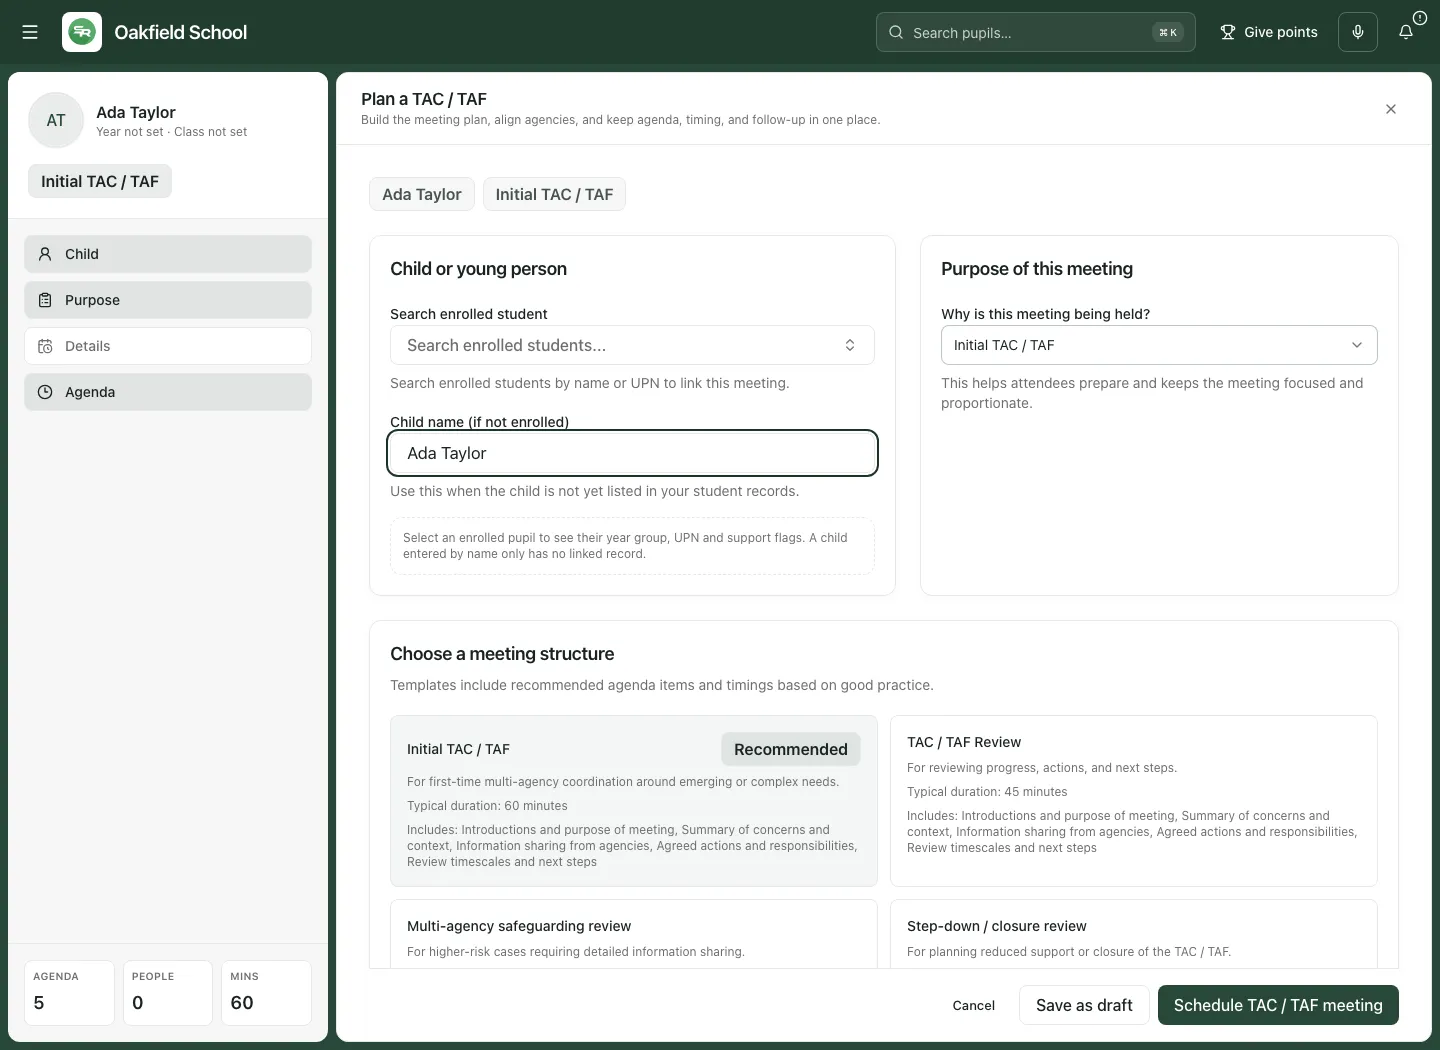
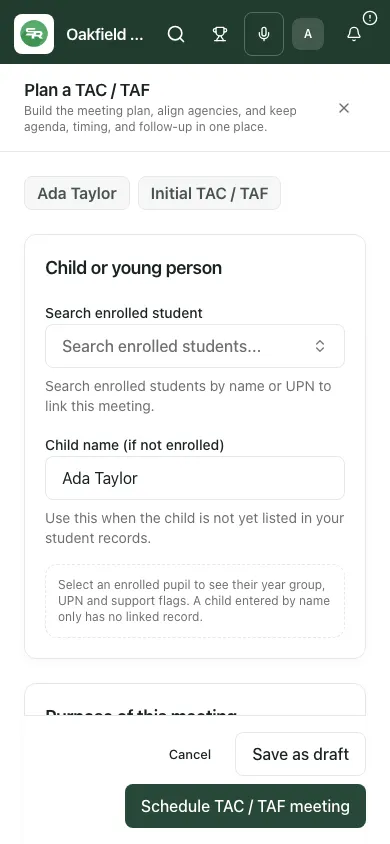
Section titled “2. Choose the child and purpose”- In the planner, use Search enrolled student to search the permitted pupil list by name or UPN and select the correct person. Check the displayed identity and year-group context.
- If the child is not enrolled, enter Child name (if not enrolled). Do not use a typed name to work around a missing permission to an existing pupil.
- Under Why is this meeting being held?, choose the actual purpose, such as an initial meeting, review, escalation, de-escalation/step-down or other.
- Review the context and who should be involved before moving to the meeting structure.
3. Choose a proportionate meeting structure
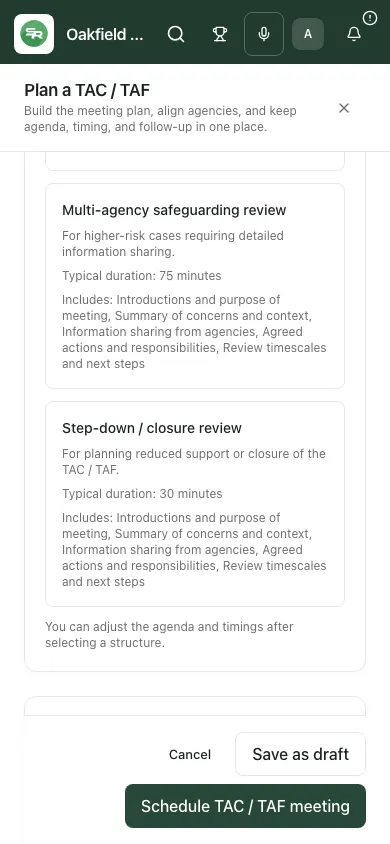
Section titled “3. Choose a proportionate meeting structure”Under Choose a meeting structure, select one of the offered structures:
| Structure | Initial suggested duration |
|---|---|
| Initial TAC / TAF | 60 minutes |
| TAC / TAF Review | 45 minutes |
| Multi-agency safeguarding review | 75 minutes |
| Step-down / closure review | 30 minutes |
- Read the structure’s description and select it deliberately.
- The structure supplies the purpose, suggested meeting length and agenda timings. Review these after selecting it; a later structure choice can replace the earlier structure’s agenda.
- Adapt the agenda and duration to the actual meeting. A recommended structure does not make a professional decision about risk or the required level of intervention.
The starting agenda covers introductions and purpose; concerns and context; agency information; agreed actions and responsibilities; and review timescales and next steps.
4. Set the meeting details
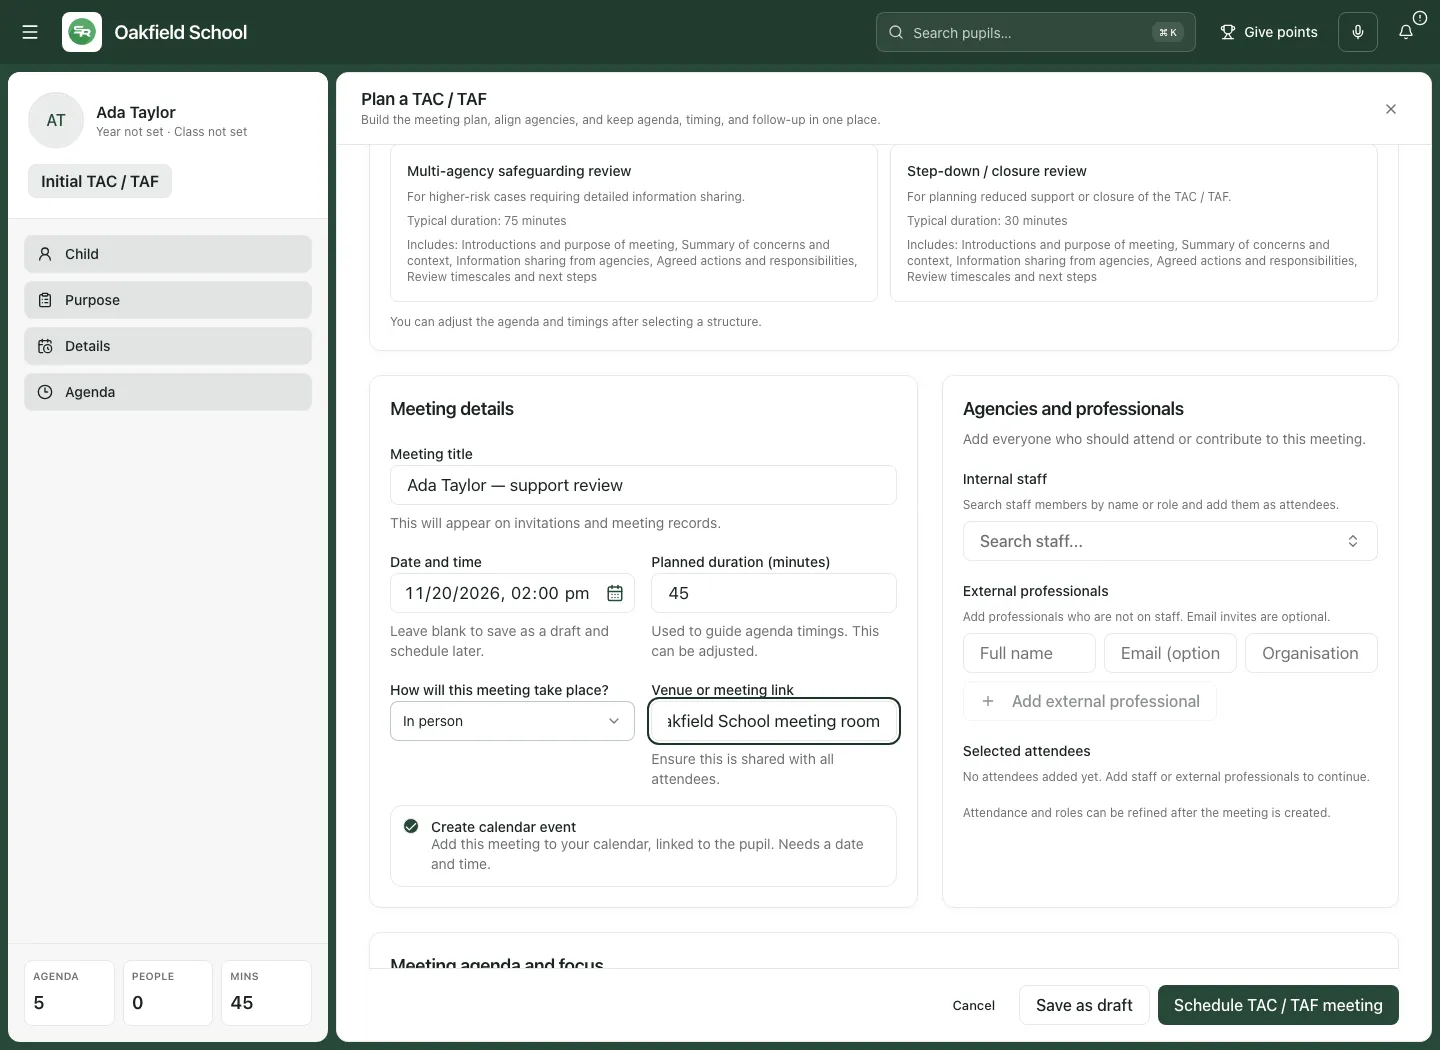
Section titled “4. Set the meeting details”- Enter Meeting title (at least two characters) with a useful, appropriately private title. It appears on invitations and meeting records.
- Enter Date and time using the school clock. Leave it blank when saving an unscheduled draft.
- Set Planned duration (minutes) as a whole number from 1 to 1,440 when supplied. Check that the agenda fits that length.
- Choose How will this meeting take place?: In person, Online or Hybrid.
- Complete Venue or meeting link. Verify that the intended attendees can use the venue or link through the school’s approved process.
- Review Create calendar event. A Calendar event needs a date/time and has its own sync/link result after the meeting is saved. The option does not send invitations.
- Recheck the school-date/time before saving, especially near a clock change. Correct any invalid-time message rather than guessing an instant.
5. Add the people who should attend
Section titled “5. Add the people who should attend”- Under Agencies and professionals → Internal staff, use Search staff… to find the intended staff member by name or role and add them.
- Read any identity warning. If a matching name and role is ambiguous and selection is unavailable, resolve the directory identity rather than choosing another similarly named person.
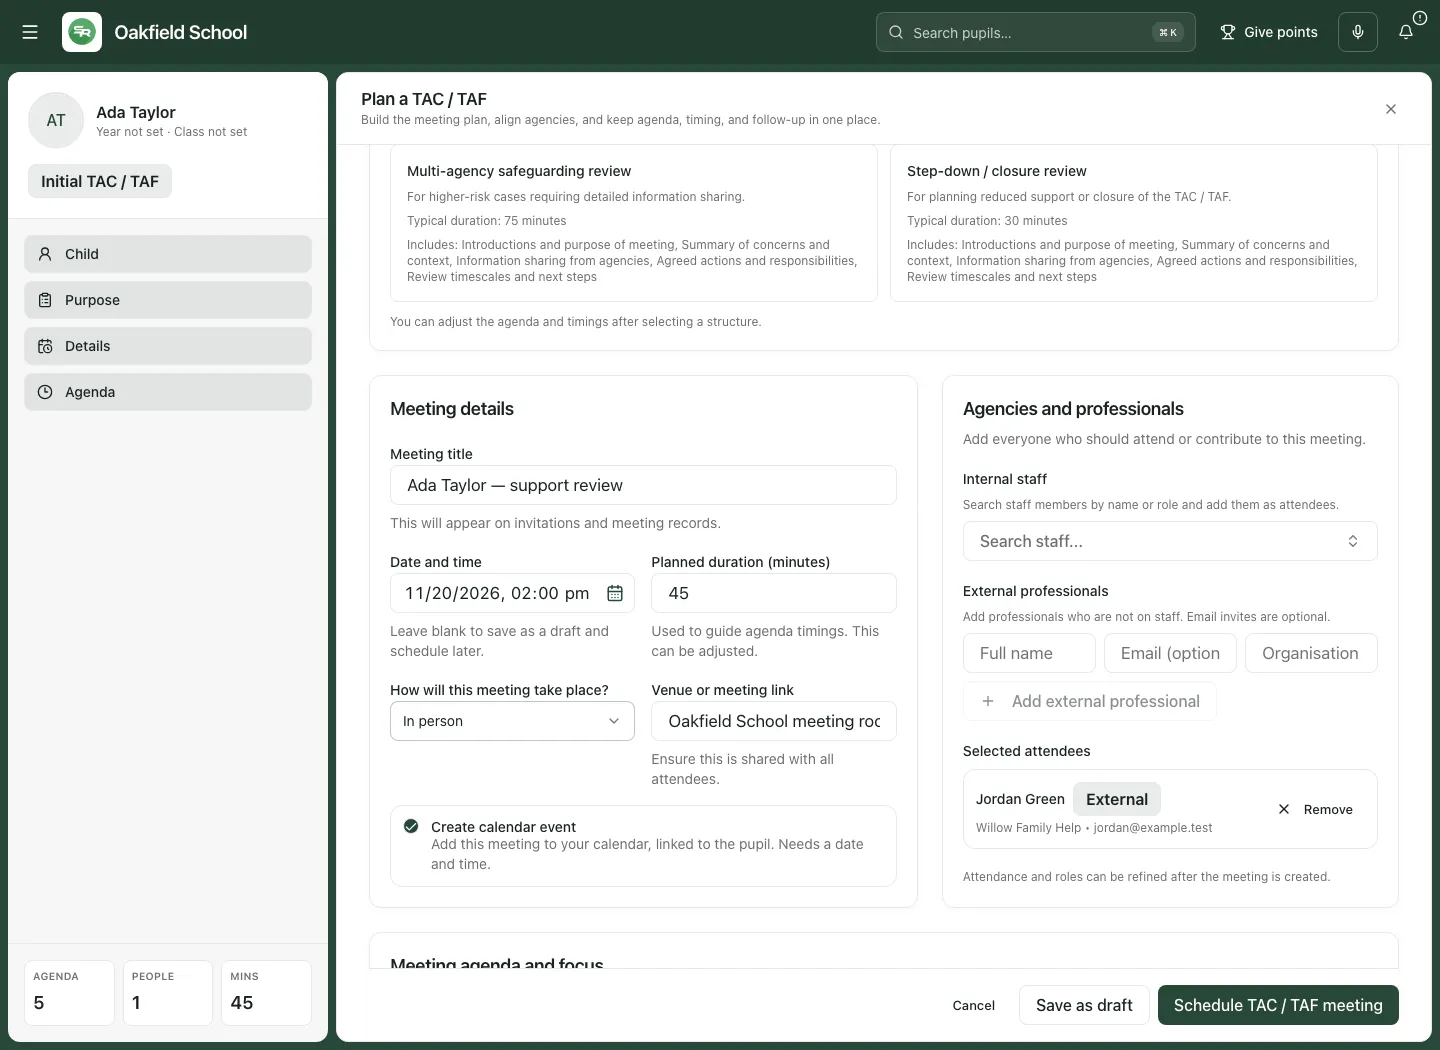
- For an external attendee, enter External professional name, External professional email where relevant, and External professional organisation.
- Choose Add external professional. Adding the attendee does not send an email; the email route is optional and reviewed later.
- Read Selected attendees, including available contact labels, roles and organisation. Use the person’s Remove control to remove an unintended attendee before saving.
- Confirm that the list represents the actual agreed meeting. Attendance and roles can be refined in the saved meeting.
A directory or email address is not proof the person has accepted, attended or consented to recording. Do not infer restricted case access from meeting attendance.
6. Build and preview a usable agenda
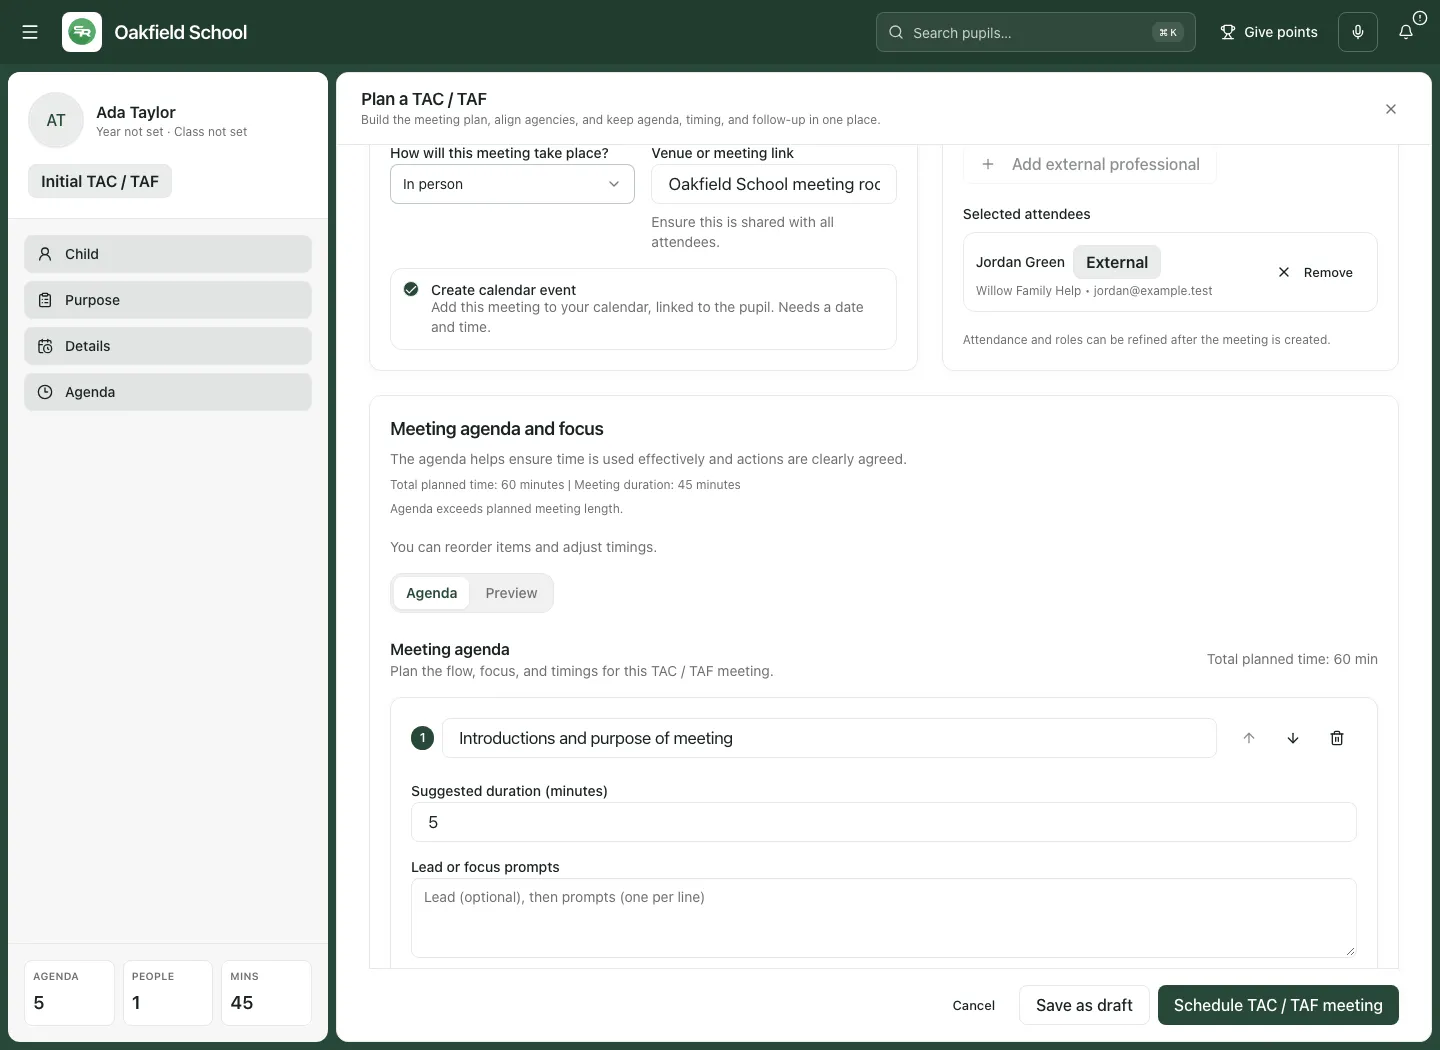
Section titled “6. Build and preview a usable agenda”- Open Agenda under Meeting agenda and focus.
- Edit each agenda title using its numbered title field.
- Set Suggested duration (minutes) for the item.
- Complete Lead or focus prompts with the intended lead and prompts, one per line as indicated.
- Use Move agenda item up or Move agenda item down to reorder it. Use Remove agenda item only for an item you no longer intend to cover.
- Choose Add agenda item to add another section, then supply its title, timing and prompts.
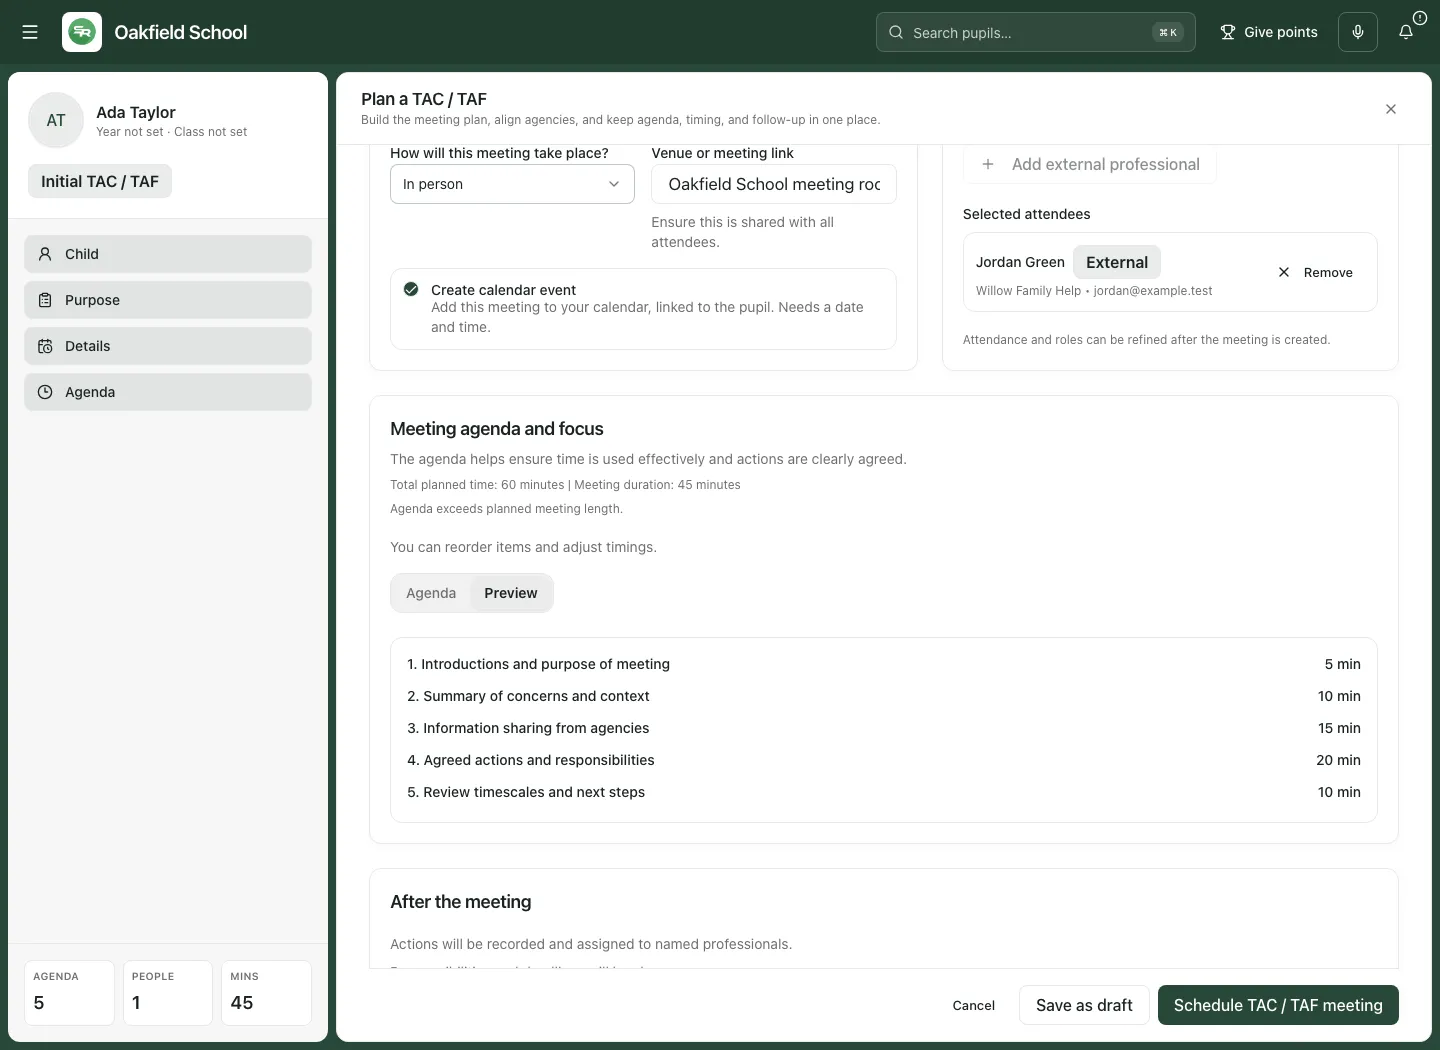
- Read Total planned time alongside Meeting duration. Agenda exceeds planned meeting length is a prompt to revise the agenda or the meeting length deliberately.
- Choose Preview to read the ordered titles, timings and prompts as a whole.
- Return to Agenda to make any needed changes before saving.
7. Save a draft or schedule the meeting
Section titled “7. Save a draft or schedule the meeting”Save while arrangements are incomplete
Section titled “Save while arrangements are incomplete”- Check the required title, child identity/name and purpose.
- Choose Save as draft.
- Wait for Draft saved and the resulting saved meeting. A save failure is not a draft you can rely on later.
- Reopen the meeting from the dashboard and review its attendees, agenda and timings before scheduling.
Schedule deliberately
Section titled “Schedule deliberately”- Review the child, purpose, structure, date/time, duration, venue, attendees, agenda and Calendar choice.
- Choose Schedule TAC / TAF meeting.
- Read the actual result. Meeting scheduled explicitly states that no invitations have been sent yet; send them from the saved meeting’s Participants tab.
- If Some attendees were not added appears, inspect the saved meeting’s actual participant list and repair it before dispatching invitations.
- If Calendar event skipped, add a date/time through the appropriate saved meeting workflow if a Calendar entry is intended.
- If Calendar sync failed or Calendar link not saved appears, keep the saved meeting result separate from the missing Calendar result. Resolve the existing meeting’s link rather than creating a second meeting merely to retry Calendar creation.
- Read any Unable to save meeting result and recovery guidance. Do not treat a click, a closed dialog or a partial operation as a fully scheduled meeting with all attendees.
Saving can open the new meeting in its working view. Recheck what was actually saved before moving on.
8. Send invitations from the saved meeting
Section titled “8. Send invitations from the saved meeting”- Open the correct saved meeting and its Participants tab or the offered saved-meeting invitation control.
- Review who is actually included and which recipients have a usable email route. A selected attendee without a usable address is not an email recipient.
- Open Send TAC / TAF invites.
- Read the recipient list and meeting details.
- Choose whether to Include calendar invite (ICS attachment).
- Use Download ICS if you need the Calendar file separately. It requires a usable schedule and does not send email or establish acceptance.
- Choose Send invites only when the actual audience and details are correct.
- Read the returned delivery outcome. A dispatch accepted by a provider is distinct from delivery, reading, RSVP and attendance. Follow the specific recovery/retry controls for rejected or uncertain items; do not resend a whole invitation set blindly.
9. Continue into the meeting and review
Section titled “9. Continue into the meeting and review”The dashboard’s Open runner and Summary connect scheduling to the later meeting record. Use them for the intended meeting, with its own current management authority.
In the working meeting, use the agenda to guide the discussion and record professional decisions, actions, ownership and review arrangements. Section timers organise time; they do not establish that every topic was adequately considered. Keep actual attendance and consent separate from the draft invite list.
Recording and transcription are separate sensitive operations. The meeting provides consent states and notes, recording exceptions and recovery controls. Do not start recording, upload audio or request transcription merely because a meeting is scheduled or an attendee email exists. Follow the school’s permission, consent and human review arrangements and read the displayed state before dispatching any transcription or generated-minute operation.
Review any generated transcript or minutes against the actual meeting and source evidence before relying on or sharing them. A generated draft is not an authorised professional decision. Agreed actions still need named responsibility, deadlines and later outcome review; completing an action does not prove support worked.
10. Prepare on a phone
Section titled “10. Prepare on a phone”- Open the planning entry point from the dashboard.
- Work through the child, purpose, structure, meeting details and attendee list.
- Scroll within the planner to the Agenda and Preview tabs.
- Compare the total agenda time with the meeting duration and review the final save choice.
- Keep the screen private and use the draft discard controls deliberately when leaving.
Troubleshooting
Section titled “Troubleshooting”| Situation | What to do |
|---|---|
| Schedule entry point disabled | The current account needs meeting-management authority. Reading meetings alone does not grant creation. |
| Pupil absent from the picker | Check school, search and permitted pupil access. Typed fallback names are for children not enrolled, not a bypass. |
| Ambiguous staff identity | Resolve the directory identity; do not rely on a same-name match. |
| Agenda longer than meeting | Adjust timings, structure or meeting length after professional review. |
| Some attendees not added | Inspect the actual saved list before invitations. |
| Meeting saved but Calendar failed | Keep the meeting and Calendar outcomes separate and repair the existing link. |
| No ICS available | Check the meeting’s usable date/time. |
| Invitation result uncertain | Use the returned original-delivery recovery process rather than duplicating dispatch. |
| Meeting unavailable after school change | Reopen from the current school’s permitted dashboard; do not reuse a previous school’s draft. |
Frequently asked questions
Section titled “Frequently asked questions”Does Schedule send invitations? No. Invitations are sent deliberately from the saved meeting.
Does creating a Calendar event invite everyone? No. Calendar sync and email invitations are separate operations.
Can I plan for a child not enrolled yet? Use the explicit child-name field. It does not create a pupil or grant access to another child’s record.
Is an attendee necessarily present or recording-consenting? No. Actual attendance, RSVP and recording consent have their own states.
Does a completed meeting prove the plan worked? No. Record and review the actual evidence and outcomes.
Where do I keep the wider plan? Use the Multi-Agency guide. Authorised safeguarding response is covered in DSL Action Board.