Plan and review a week of EYFS continuous provision
Written for: Nursery and Reception practitioners and leads.
Open a weekly plan, add learning areas and focus children, record enhancements and next steps, then save and review delivery.
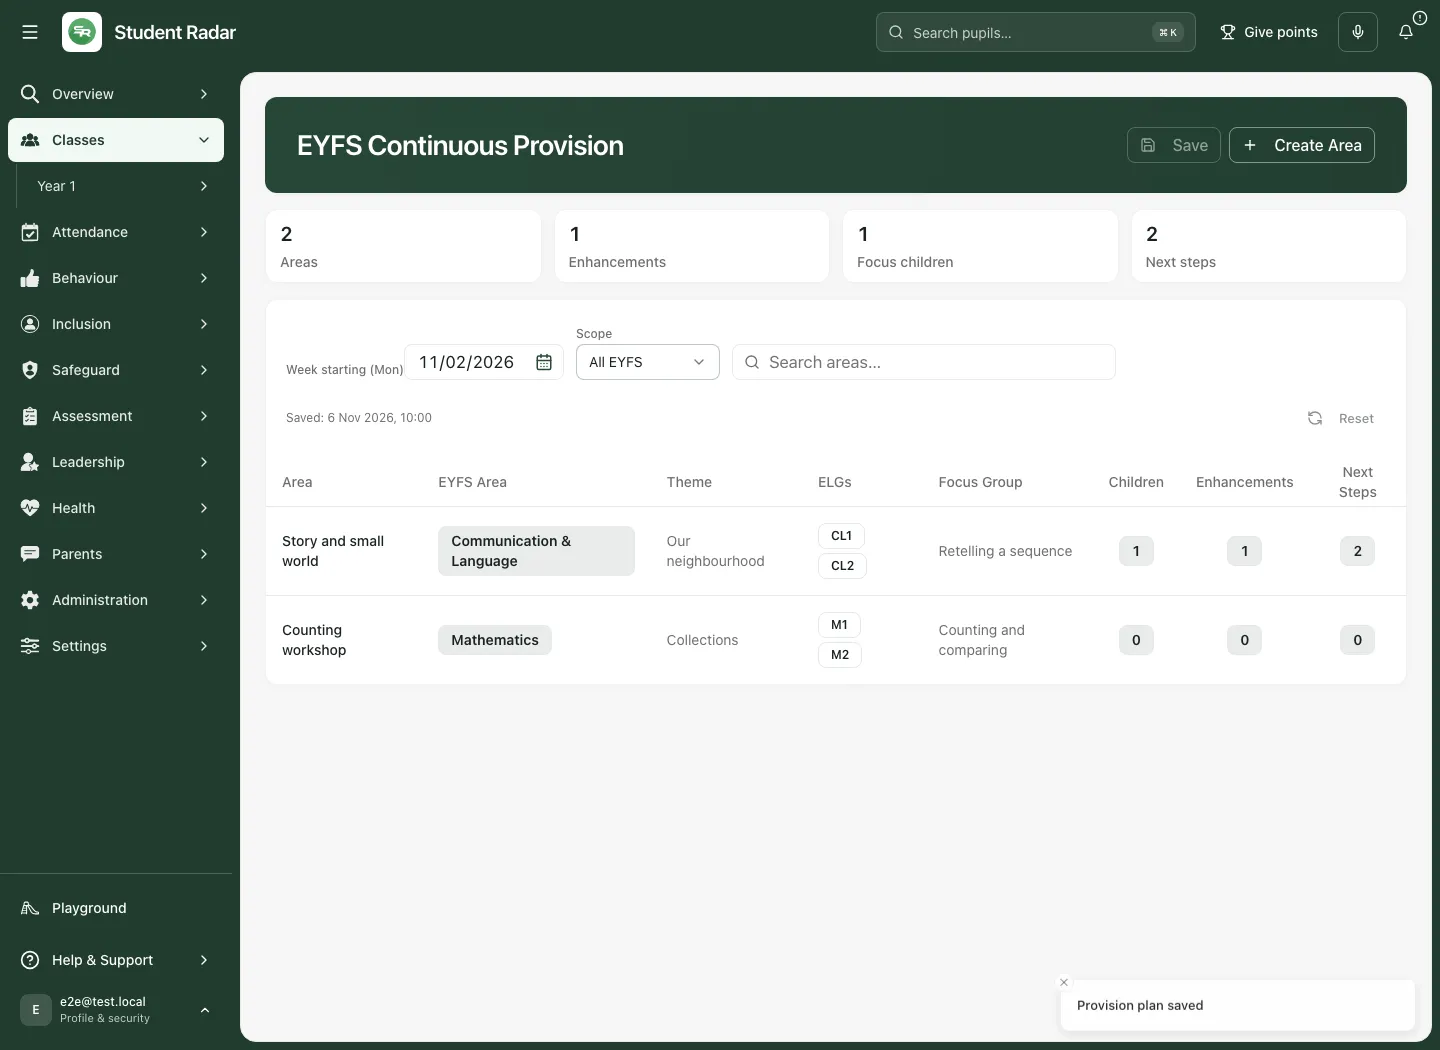
The page is titled EYFS Continuous Provision. It is a plan to guide practice, not a record that an activity happened or evidence that it improved an outcome.
Start from what you have observed, agree the provision you want to offer and decide who will review it. The examples use a fictional story area and counting workshop.
Before you start
Section titled “Before you start”You need access to Provision planning for the correct school. Confirm the week and whether the plan is for all EYFS or one class. A class link narrows the context but does not grant additional access. Ask your school’s administrator if you cannot open the tool or a class is unavailable.
Discuss the purpose with colleagues: what opportunity should children have, what resources need preparing and what observation will help you review it? Have the relevant learning goals and factual observations ready. Keep sensitive information in its authorised source; the shared provision plan needs only the detail practitioners need to deliver the provision.
Open the correct weekly plan
Section titled “Open the correct weekly plan”- Open Classes, choose the Nursery or Reception class and select Provision planning where offered. You can also use the school’s permitted Provision planning entry.
- Check the page title EYFS Continuous Provision.
- Check Week starting (Mon). Selecting another date resolves to the Monday of that week.
- Set Scope to All EYFS or Class. For Class, choose the class shown in the additional control.
- Read the saved state below the filters. Not saved yet differs from a saved timestamp. Saved state unavailable means you cannot rely on a confirmed plan yet.
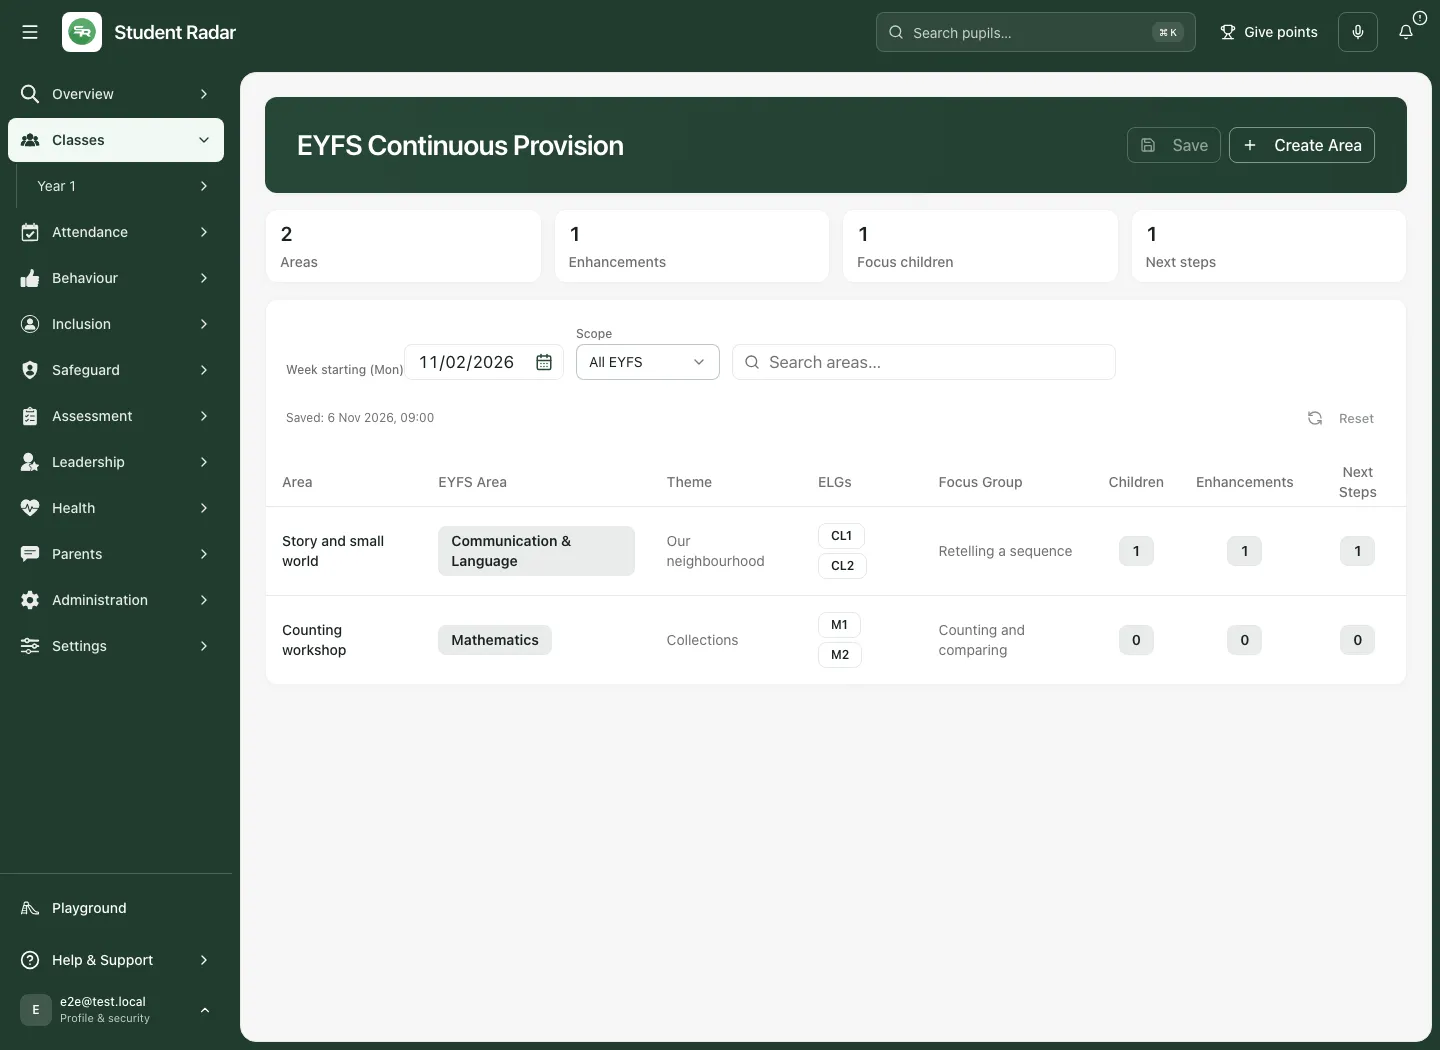
A week and scope identify a separate plan. The all-EYFS plan is not automatically the same plan as each class’s plan. Check both controls before changing a shared record.
Read the plan
Section titled “Read the plan”Each row is a provision area. The table brings together its name, EYFS area, theme, ELG links, focus children, enhancements and next steps. Use Search areas… to locate an area; clear the search to see the full plan again.
The counts above the table describe the current plan’s areas, enhancements, focus children and next steps. They describe planning coverage, not participation, delivery, progress or impact. They do not show whether a resource was prepared or a child took part.
- Select an area’s name, such as Story and small world.
- Read its theme, focus group and learning goal links.
- Review the named focus children, existing enhancements and next steps.
- Check the plan against the observations that prompted it, rather than treating an old plan as current evidence.
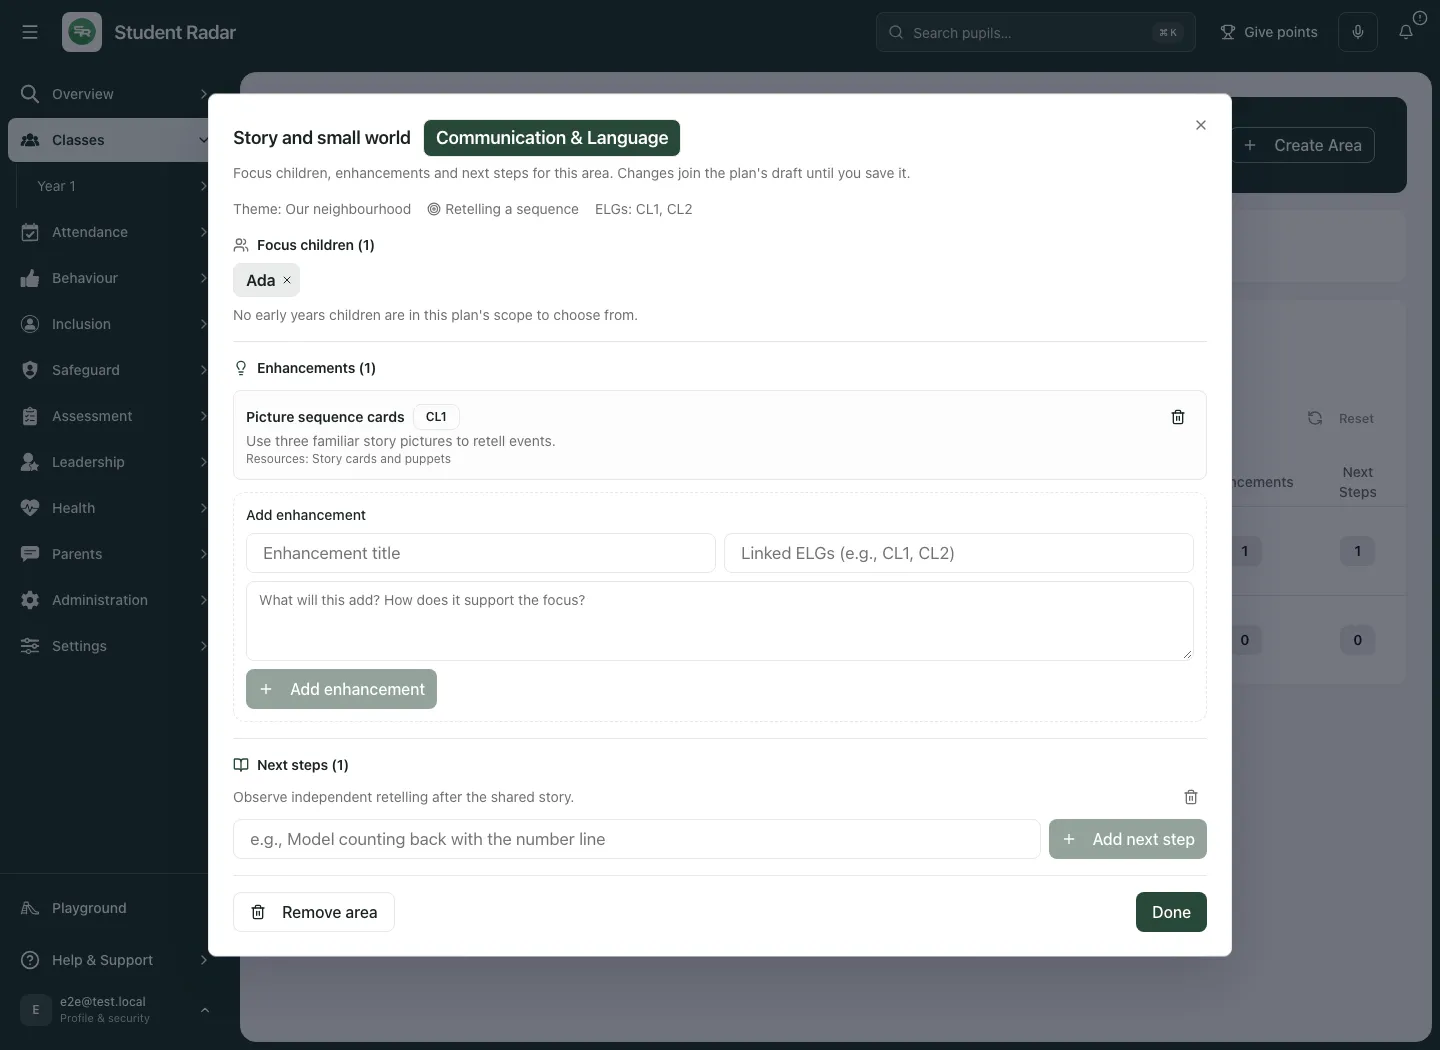
Create an area
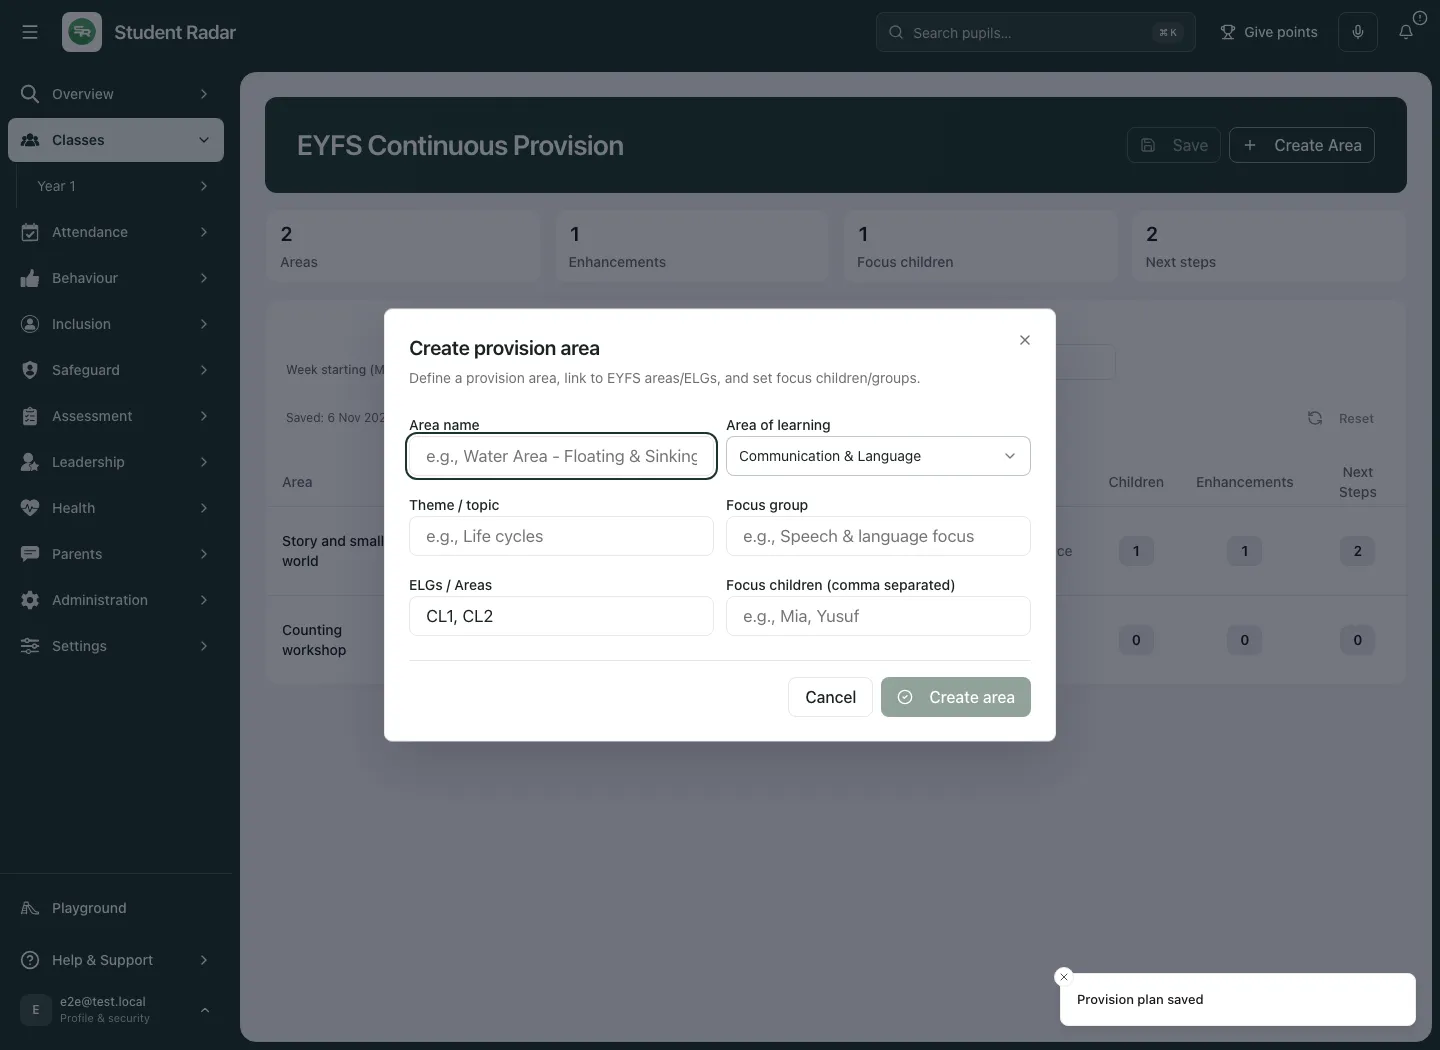
Section titled “Create an area”- Select Create Area.
- In Create provision area, enter a clear Area name, for example “Water exploration: floating and sinking”.
- Choose Area of learning. Check ELGs / Areas; this starts with the selected learning area’s codes and accepts a comma-separated list.
- Add Theme / topic if useful.
- Describe the Focus group in practical terms. Avoid including unnecessary sensitive labels.
- If useful, add Focus children (comma separated). Typed names are text labels; they are not verified pupil identities.
- Select Create area. The new row joins the draft.
- Review the whole plan and select the page’s Save button to keep it.
An empty week offers Create starter scaffold. This creates a draft structure across the EYFS learning areas for you to adapt. It is a starting framework, not a completed plan or generated evidence. Add the context, intended opportunities and review steps your team actually agrees, then save.
Choose focus children from the roster
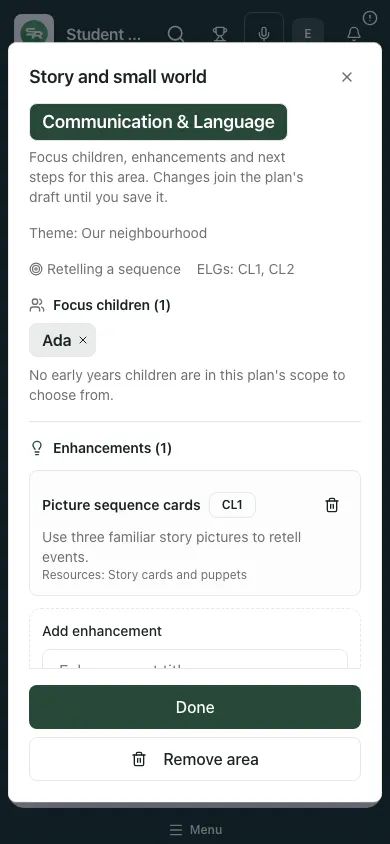
Section titled “Choose focus children from the roster”Open an area and use Choose a focus child where eligible children are available. Select the child and select Add. This keeps an existing pupil reference, whereas names typed in the create dialog remain labels.
Check the child and class before adding them. If a child is unavailable, check the school, scope and roster with an administrator rather than typing a similar name and assuming a link was made. Remove an unintended focus child with their remove control. These changes remain part of the plan’s draft until you save the plan.
Add an enhancement
Section titled “Add an enhancement”An enhancement says what the provision will add or change. Make it specific enough for another practitioner to prepare and use.
- Open the area.
- Enter an Enhancement title, such as “Picture sequence cards”.
- Describe What the enhancement adds: the materials, opportunity or support you intend to offer.
- Add the relevant Linked ELGs rather than attaching unrelated goals.
- Select Add enhancement.
- Review it in the area’s enhancement list. Use its remove control if it is no longer intended.
- Close the detail dialog with Done, then save the plan.
Avoid writing an intended response as an observed outcome. “Offer three picture cards for retelling” is a plan; “retold independently” requires a real observation recorded in the assessment workflow.
Add and review next steps
Section titled “Add and review next steps”- Open the area and find Next steps.
- Type a specific Next step. For example: “Check who can retell the ending without a prompt.”
- Select Add next step.
- Read the item in the list and remove it if it is duplicated or no longer needed.
- Select Done, then Save on the page.
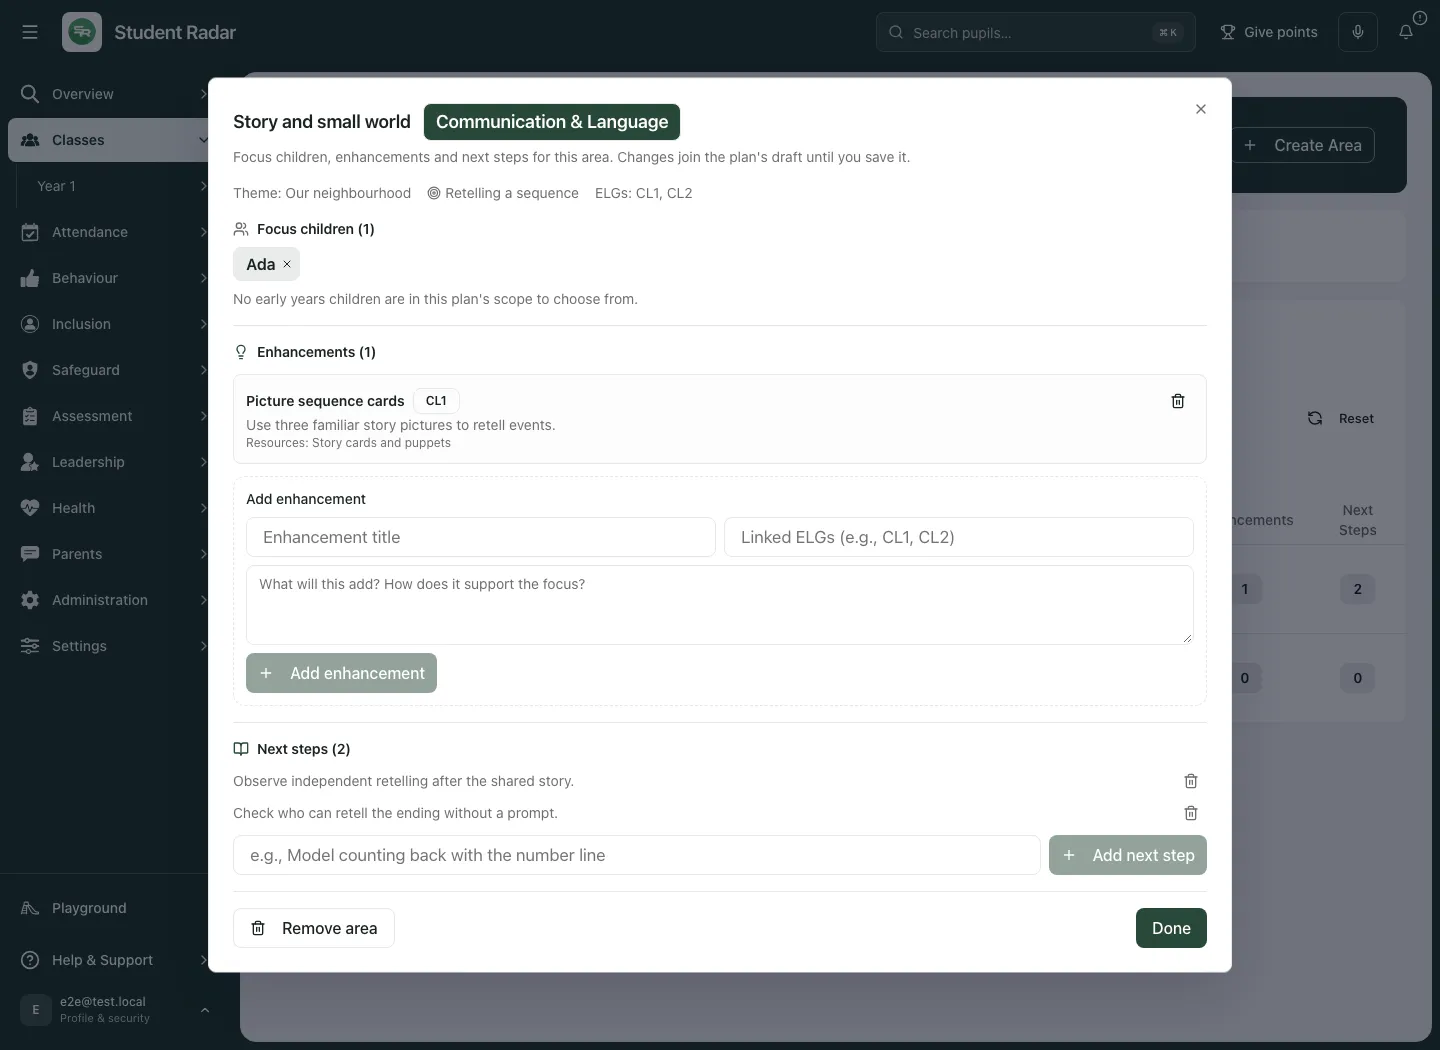
Next steps in this plan are planning text. Adding one does not establish an assigned task, calendar booking or completed review. Agree an owner and time through your school’s normal work arrangements where those are needed. If the suggestions area has no suggestions, use your own observations; do not invent evidence to fill it.
Save and confirm the plan
Section titled “Save and confirm the plan”- Look for Unsaved changes below the controls.
- Review the week and scope again.
- Select Save and wait for the save to finish.
- Confirm the unsaved marker has cleared and the saved state is shown.
- Reopen the same week and scope when you need to check the shared record.
Drafts are retained for their week and scope while the planner stays open. Switching away and back within the open planner can restore that draft; it is not a substitute for saving. Reloading or closing the page can lose unsaved work. Read any warning before leaving.
Reset returns the current draft to the last saved version. Use it only when you intend to discard your current changes. It does not mean the previously saved plan is deleted.
If a colleague has saved since you started
Section titled “If a colleague has saved since you started”The planner can tell you that someone else saved the week’s plan after your draft began. Read the warning before continuing. Reset lets you see their saved version. Replace with my draft deliberately replaces that version with your draft. Coordinate with the colleague and compare the intended changes first; do not routinely replace a shared plan to dismiss the warning.
If the app cannot confirm the saved plan, it retains the draft and tells you. Keep that distinction clear: an attempted save is not a confirmed shared record.
Work on a phone
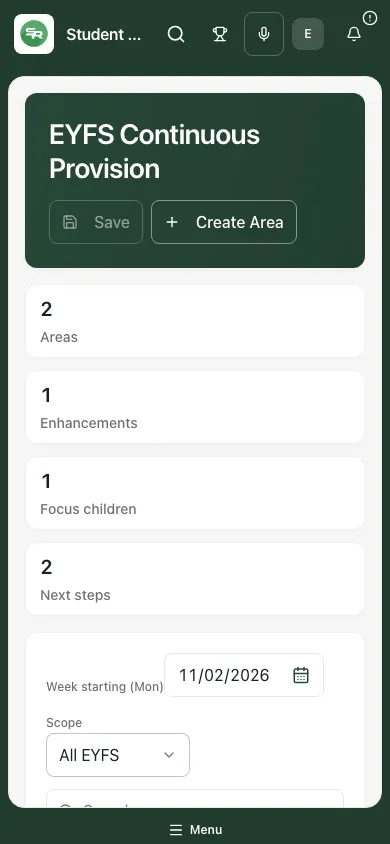
Section titled “Work on a phone”Check week and scope near the top of the page, then move across the table to read the area details. Tap the area name to open its dialog. The detail dialog scrolls so you can review focus children, enhancements and next steps before selecting Done. Save from the page after completing your changes.
Review provision after delivery
Section titled “Review provision after delivery”At the agreed review, return to the original observations and record what actually happened in the appropriate assessment or evidence workflow. Compare the context and support used. Decide whether to keep, adapt or stop the provision and agree the next observation. Do not infer impact from the number of enhancements or next steps in the plan.
Changing a future week’s plan does not itself update an EYFS judgement, contact a family or assign work. Use the appropriate tools deliberately and check their outcomes.
Troubleshooting
Section titled “Troubleshooting”| What you see | What to do |
|---|---|
| No plan saved for this week | Check week and scope. Create an area or use the starter scaffold if this is genuinely a new plan. |
| No areas match your search | Clear Search areas. |
| No classes found | Ask an administrator to check the EYFS pupil roster. Use the intended available scope; do not assume a missing class has no children. |
| Plan could not be loaded or saved state unavailable | Retry the load and check your connection. Do not treat this as an empty confirmed plan. |
| Save unavailable | Check whether anything has changed and whether the plan finished loading. |
| Someone else saved this week’s plan | Compare with the colleague; Reset to their version or deliberately replace after review. |
| Saved plan could not be confirmed | Keep the retained draft, check the connection and retry as instructed. |
| Unsaved draft warning on leaving | Stay on the page and save if you need those changes. |
| A focus name is present but not linked | Typed names are labels. Use the roster chooser when you need a verified child reference. |
Frequently asked questions
Section titled “Frequently asked questions”Is this the SEND Provision Map? No. This page plans EYFS continuous provision for a week and scope. Specialist SEND provision records have their own workflow.
Does the starter scaffold know what my children need? No. It supplies a structure. Staff decide the content from actual observations and professional judgement.
Does adding a next step assign someone? No. Agree and record responsibility separately where needed.
Is a draft kept after closing the page? Do not rely on it. Save and confirm the plan before leaving.
Do counts show impact? No. They count planning items. Review observed outcomes separately.