Enter, save and review class assessments in Assess
Written for: Teachers and assessment leads.
Choose the class, scheme, term and date, enter judgements or scores, then save and reopen the assessment.
Open the right class, choose the term and assessment date, work through the marksheet and save. Where your school uses Assessment Tracker or Quest, the assessment scheme selector also provides those dedicated result and import workflows.
The examples use fictional pupils and a sample WTS/EXS/GDS scale. Your school may use different subjects, scales, score ranges or statement grids. A mark is an assessment record, not proof that an intervention worked or a substitute for your professional judgement.
Before you start
Section titled “Before you start”Check the school, class, term and date. You need permission to open the page and to create or update assessments for each pupil. Access can vary by pupil and action. Seeing a pupil in another part of Student Radar does not establish assessment write access. If you have read-only access, ask your school’s administrator rather than entering the result against a different pupil.
Agree which assessment and scale you are recording. Compare like with like: a raw score, a standardised score and a teacher judgement are different measures. Keep the original measure and context when discussing results. Make sure you have evidence for the judgement and a suitable date.
Open Assess for a class
Section titled “Open Assess for a class”- Open Classes in the sidebar.
- In primary schools, choose the year group and class. In secondary schools, choose Teaching classes, then the subject and class; for a tutor group choose Tutor groups, then the year and group.
- Choose Assess.
- Check the class name and pupil list on Non-Statutory Assessments. To change a class opened this way, choose another through Classes.
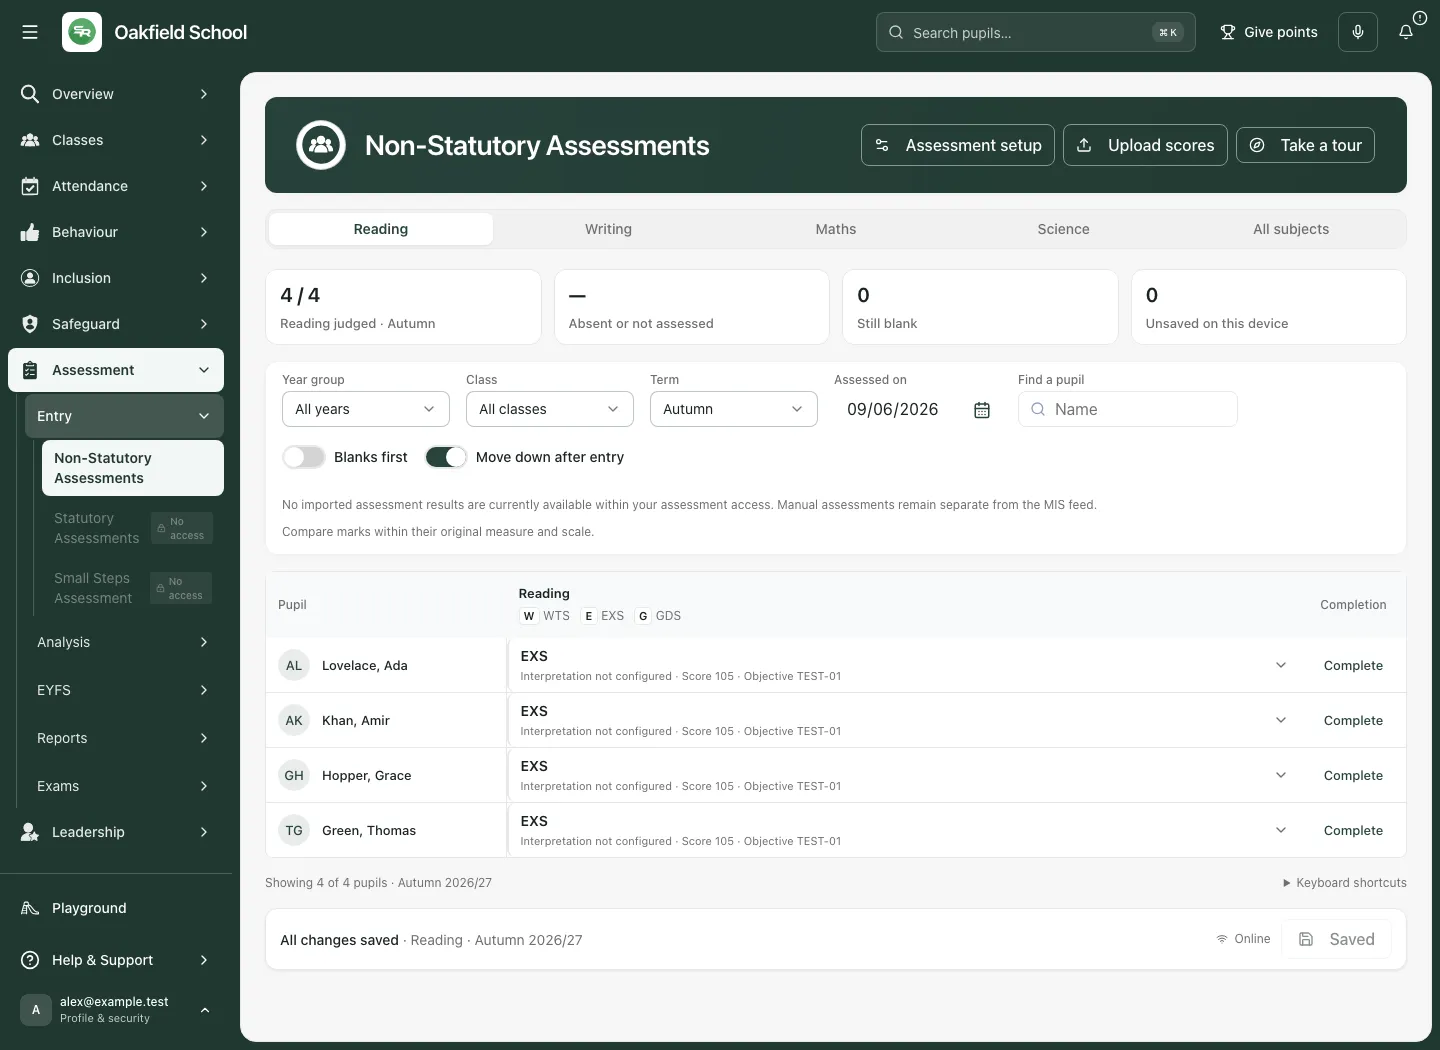
You can also open Assessment → Entry → Non-Statutory Assessments. This standalone view provides Year group and Class filters. It shows pupils within your assessment access, not an unrestricted school roster. Nursery and Reception assessment belongs in the EYFS checklist; the app directs those year groups to the appropriate workflow. Alternative Provision uses its daily check-in workflow instead of this non-statutory marksheet.
Choose what you are recording
Section titled “Choose what you are recording”- If an Assessment scheme selector is available, choose School assessments for the school’s marksheet. Other configured schemes have their own result and import controls.
- Check Term and Assessed on. The date determines the academic year for the record. Schools may have different term labels.
- Use Year group and Class where those controls appear.
- Type a name in Find a pupil to narrow the displayed rows.
- Choose a subject tab, such as Reading, or All subjects to see the subjects together.
- Use Blanks first when you want to work through pupils who still need a result. Move down after entry helps you enter a run of judgements.
Changing the assessment period can discard unsaved drafts. If the confirmation appears, cancel and save first when you need to keep your changes. Switching school or account requires a fresh workspace; do not rely on an open draft carrying across contexts.
Read coverage before filling gaps
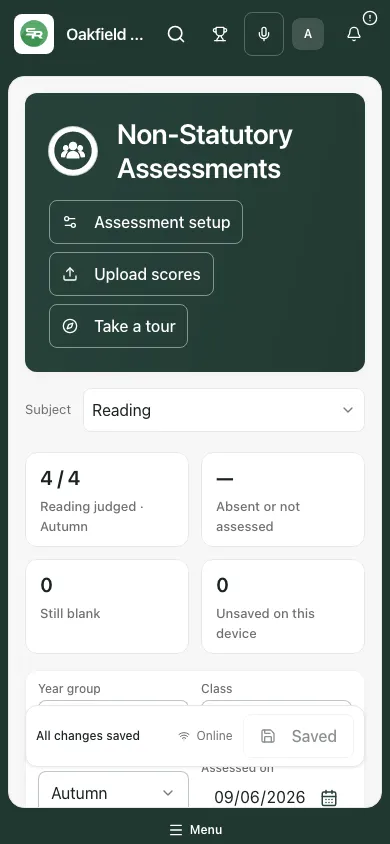
Section titled “Read coverage before filling gaps”The subject’s judged count describes the selected term and class. Still blank and Absent or not assessed are different: a missing result does not tell you why there is no judgement. Where your school has enabled explicit reasons, record the appropriate reason rather than inventing a low mark. Unsaved on this device tells you about work still waiting to be saved or synced.
Completion shows whether the relevant subjects have entries. It is not an attainment or impact measure. Filtering changes the pupils you can see, so keep the class, subject and term consistent when comparing coverage.
Enter a judgement and score
Section titled “Enter a judgement and score”- Click or tap the pupil’s cell for the correct subject.
- Check the pupil and subject at the top of the editor.
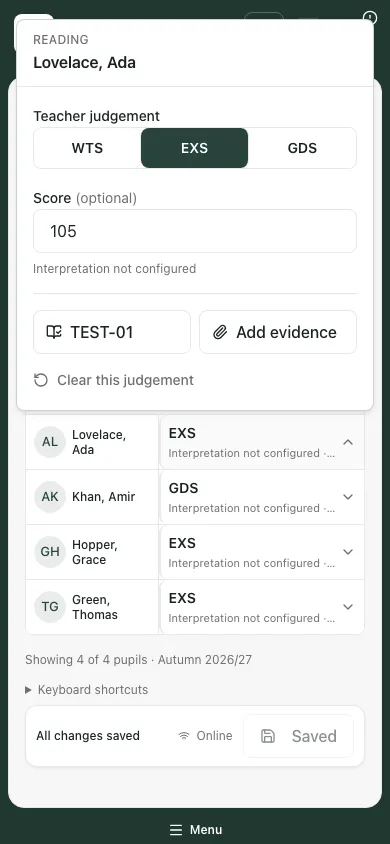
- Under Teacher judgement, choose the judgement supported by the assessment.
- If the subject accepts a score, enter it in Score. Keep within the configured range and step. A score can be optional, required or unavailable depending on the subject’s setup.
- Where available, use Link objective to associate a curriculum objective. An existing objective may appear by its code; open it to inspect or change the link.
- Use Add evidence if you need to attach supporting detail. Check any photo, document or dictated note before accepting it.
- Close the editor and check the cell. An unsaved marker and the save bar identify pending changes.
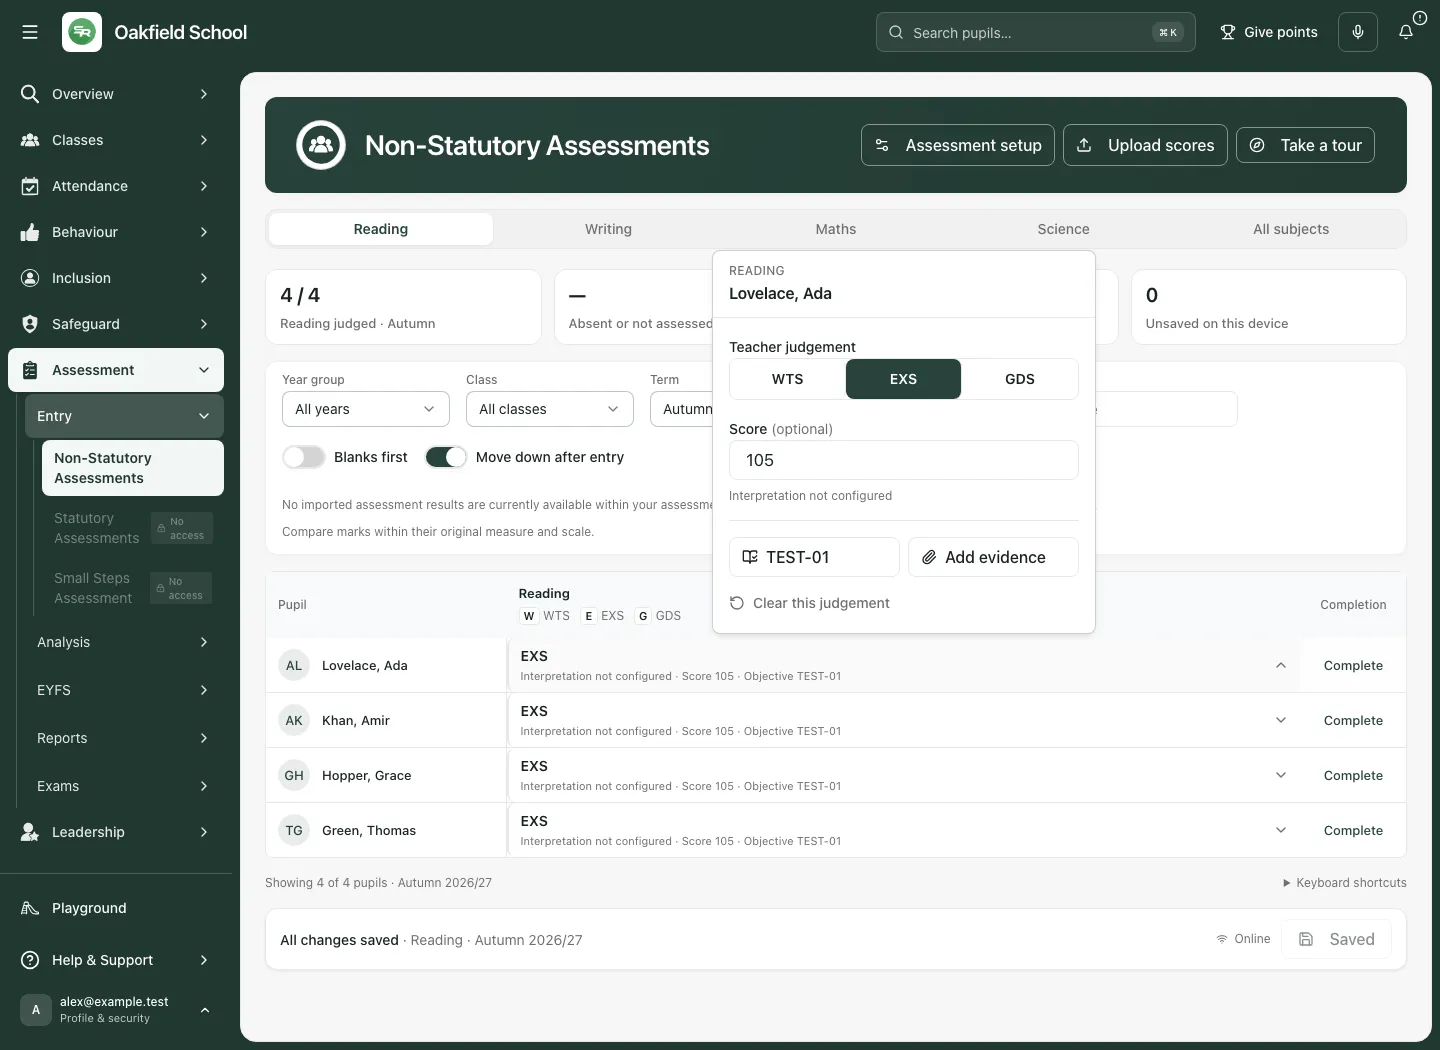
If the score interpretation says Interpretation not configured, do not assume the app has converted the score to a standardised or age-related outcome. Read it in its original scale and ask your assessment lead if the subject needs configuration.
To remove a school-entered judgement, open the cell and choose Clear this judgement, then save. Where Not judged reasons are offered, choose a reason only when it accurately describes the assessment situation. A reason is counted separately from both a judgement and a blank.
Save, check and reopen
Section titled “Save, check and reopen”- Review the pupils and subjects you changed. Changes hidden by a current filter can still be part of the current term’s draft.
- Click Save 1 change or the save button showing the current number of changes.
- Wait for Saving… to finish. A successful response returns the button to Saved and the bar to All changes saved.
- Return to the same class, subject and assessment period to check the saved record. If you need assurance that a shared school record is current, reopen it with a working connection.
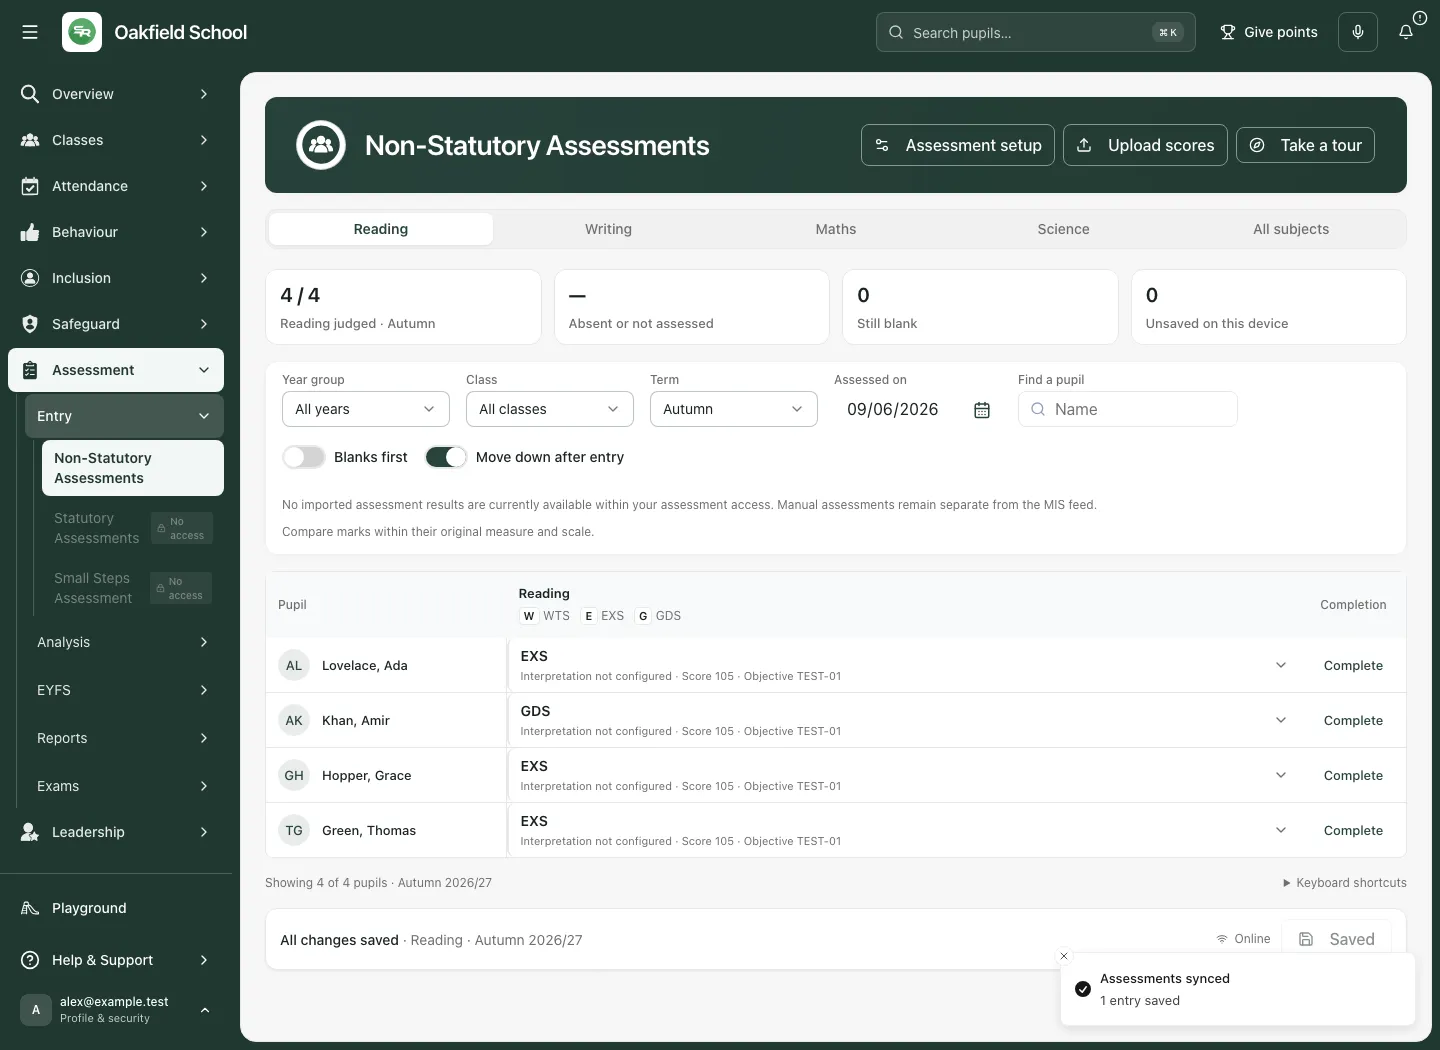
If another entry is made while a save is running, check the remaining unsaved count and save again when ready. Do not assume an earlier save includes later edits. Read any error before retrying. Avoid repeated clicks while the save is in progress.
Enter a run of marks with the keyboard
Section titled “Enter a run of marks with the keyboard”Focus the first cell; pressing Escape after opening a cell returns you to the grid. Follow the keys shown in your column heading, since your school’s judgement scale determines the shortcuts.
| Key or action | Use |
|---|---|
| Arrow keys or Tab | Move between cells. |
| A judgement’s heading key or number | Record that judgement in the focused cell. |
| Enter | Move down to the next pupil. |
| F2 or Space | Open details. |
| Backspace | Clear a value. |
| Ctrl+D / ⌘D | Fill down; check which visible pupils will receive the value first. |
| Ctrl+S / ⌘S | Save current changes. |
| Paste | Fill a block copied from a spreadsheet; inspect the filled/skipped summary and save after reviewing. |
Open Keyboard shortcuts below the grid for the reminder. Keyboard entry is faster only when you have checked the focused row, subject and period.
Upload scores from a file
Section titled “Upload scores from a file”Where your account offers Upload scores, use it to review a score file for the current assessment context.
- Check the class and period before opening Upload scores.
- Read the dialog’s expected file layout and identifiers. Prepare a CSV using those headings; keep identifying data secure.
- Choose the file and review pupil matches, subjects and values. Resolve unmatched or ambiguous pupils instead of assuming row order.
- Apply the accepted values to the grid.
- Inspect the draft marksheet, then save. Applying the import to the grid is not the final save.
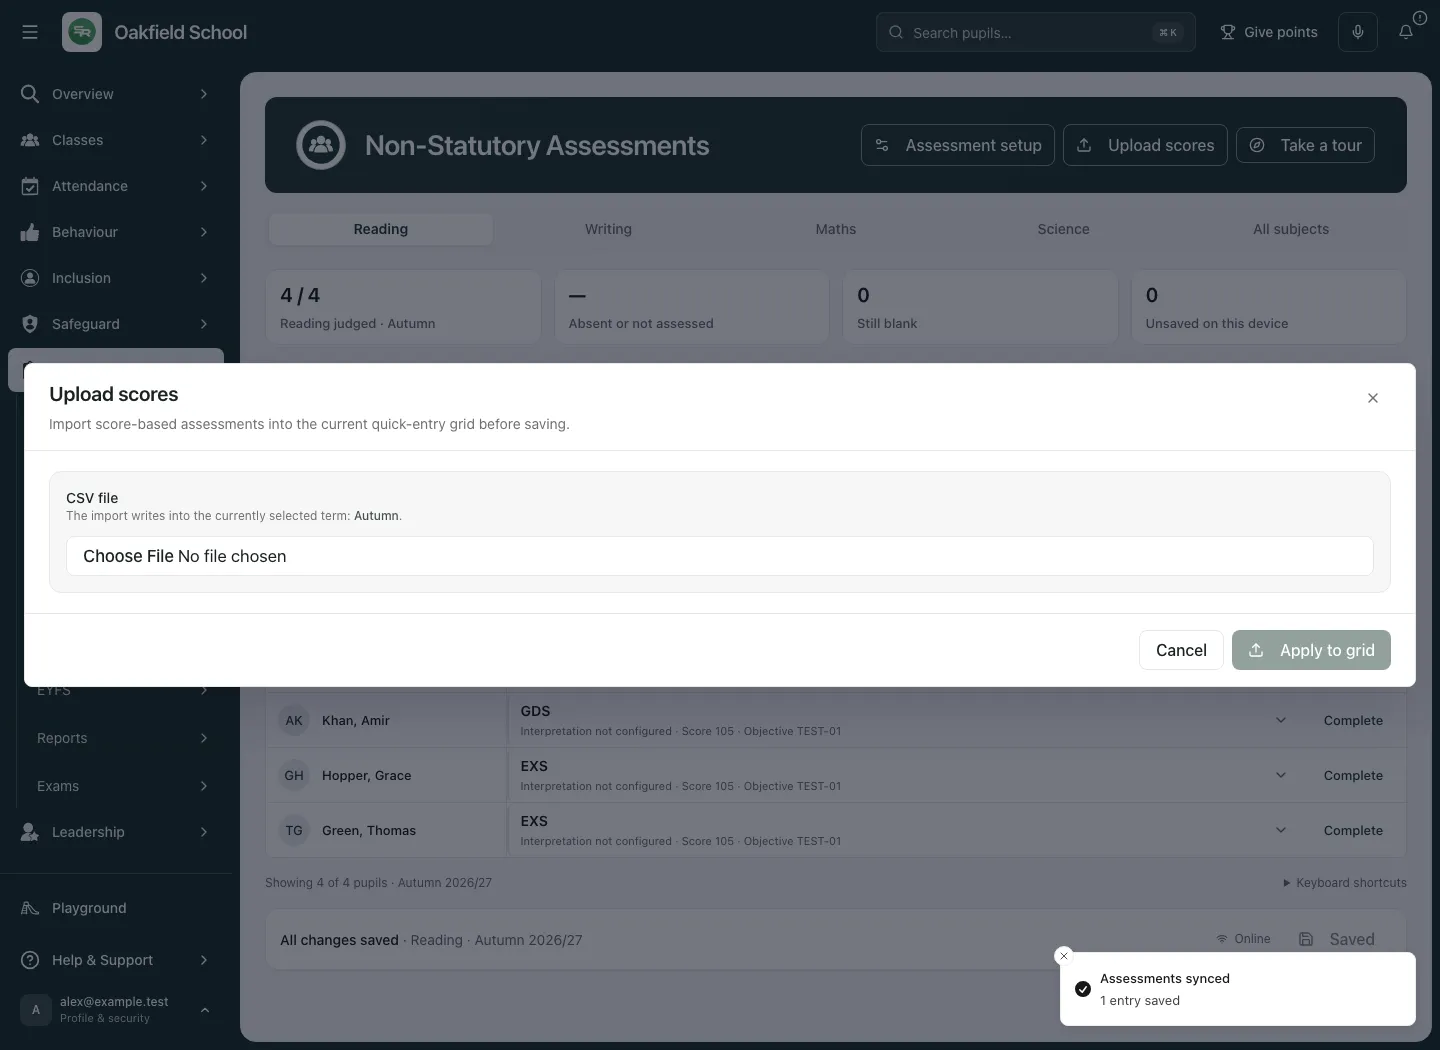
Do not use this marksheet upload as a substitute for statutory test entry or a separate Assessment Tracker/Quest import. Keep the source and assessment measure clear.
Assessment setup and other schemes
Section titled “Assessment setup and other schemes”Assessment setup appears only where the account can manage the school’s configuration. It is for maintaining the school’s subjects and entry scales; it is not a required step every time a teacher records a mark. Read the subject, grading scale, score label, range and entry mode before changing setup, because colleagues use the same school configuration. Coordinate substantial changes with your assessment lead.
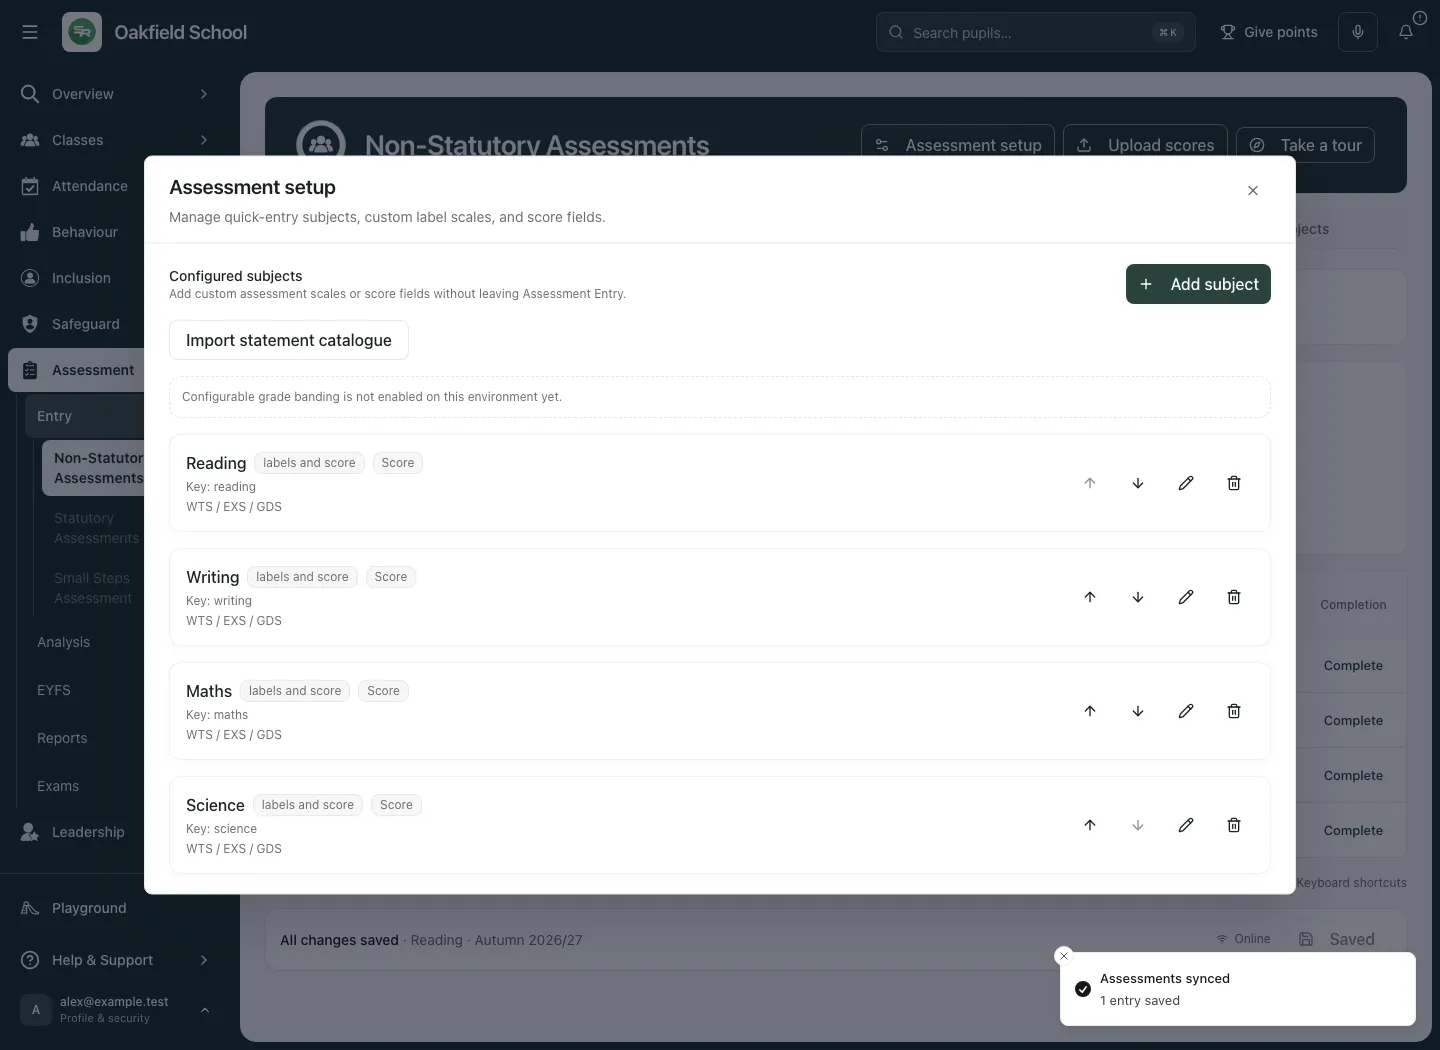
School assessment subjects can use judgements, scores, both, or configured statements. Statement grids have their own subject/year filters and paging. Do not describe one demonstrated judgement scale as the school’s universal assessment model.
If Assessment Tracker or Quest is configured, select that scheme to review its supplied results. These schemes retain their original periods and outcome measures and have their own imports. A source warning means coverage could not be checked; it does not mean no results exist. Imported MIS marks remain separate from manual school judgements and are available in relevant reports and pupil history. Never replace a missing feed with guessed results.
Statutory phonics, multiplication tables checks and key stage results belong in Assessment → Entry → Statutory Assessments. EYFS ongoing observations use EYFS Assess.
Use Assess on a phone
Section titled “Use Assess on a phone”Choose a single subject to keep the grid manageable. Scroll within the marksheet and tap the pupil’s cell to open the full editor. Check the pupil and subject again before recording a value. Use the save bar and wait for the result before leaving the page.
Connection and offline work
Section titled “Connection and offline work”Read Online, Offline, pending queue and sync messages. An offline queue is local to this device; it is not proof that the school’s shared record has been updated. When the connection returns, use Sync if offered and confirm the pending count clears. Keep the same account and school context. If a result matters for a report or meeting, check the shared record online before relying on it.
Do not leave a shared device with unsaved or queued pupil data. Follow your school’s device and information-handling arrangements. If syncing fails, preserve the observation securely and ask for help without sending unnecessary pupil details.
Troubleshooting
Section titled “Troubleshooting”| What you see | What to do |
|---|---|
| Read-only access or Read only in a cell | Ask an administrator to check assessment create/update access for that pupil. |
| Set up school assessment subjects | Ask the assessment lead to configure the subjects and scales. |
| No pupils match the current filters | Clear the name search and check year/class filters. |
| No pupils available for assessment entry | Check school and class, then ask for a roster/access check. |
| Selected class’s pupil list could not be loaded | Choose the class again or reload; do not enter marks until the roster is resolved. |
| Check score or Fix score values | Open the named pupil/subject and correct the value to the subject’s range and format. |
| Assessment data could not be loaded | Use Retry loading. This is not an empty editable marksheet. |
| Imported coverage could not be checked | Retry the appropriate source setup; absence of coverage proof is not absence of results. |
| Save failed or pending work remains | Read the message, check the connection and retry once appropriate. Confirm the saved/queued state afterwards. |
| Unsaved changes warning on leaving | Cancel and save first if you need those changes. |
| Unavailable in Alternative Provision | Use Open Daily Check-ins for that setting. |
Frequently asked questions
Section titled “Frequently asked questions”Do all subjects use WTS, EXS and GDS? No. Those are sample labels. Your school configures its own supported scales and score settings.
Does Saved mean a family has been informed? No. Saving an assessment is not evidence of a message or a follow-up task. Use the school’s communication and work processes separately.
Can I compare pupils across different tests? Keep the original test, measure, date and scale. Do not directly compare unlike scores just because they appear beside one another.
Why is a result missing here but present in pupil history? The marksheet records separate school judgements. Imported MIS results and dedicated schemes may be shown elsewhere.
Is a blank the same as absent? No. Where reasons are supported, they are recorded and counted separately. A blank alone does not explain why no mark was entered.
Who decides the next step? The authorised teacher or school team reviews the assessment evidence, agrees the response and records ownership and review arrangements in the appropriate workflow.