Prepare school messages and follow approval and delivery
Written for: School staff and authorised communications managers.
Choose the intended pupil and eligible recipients, prepare the message and channels and follow the approval and delivery states. Begin with the intended pupil and recipient, review the actual eligible audience, prepare the content and channels, and follow the recorded approval and delivery state.
A draft is not approval; approval is not sending; a queued or provider-accepted delivery is not proof the family received, read or acted on it. Staff retain responsibility for the actual message, audience and professional follow-up. All screenshots are fictional examples; no message was sent.
Before you start
Section titled “Before you start”Check your school and current permissions. Direct composing, bulk campaigns, approval, groups, templates, translations, automation, settings, delivery audit and emergency broadcast are separately controlled. A colleague may see fewer tabs. A pupil relationship, message link or recipient name does not grant access to restricted sources.
This guide describes the current school Communications workspace reached through Parents → Connect. The older route name does not mean new messages use the old story/archive system. Alternative Provision schools use their governed Family Messages contact-record workflow because their family-account arrangements differ; do not follow school parent-portal sending steps in that different workspace.
Confirm recipient relationships and the appropriateness of disclosure before writing. Do not guess an email address or choose another child to get around missing access. Use the school’s urgent direct-contact arrangements when an immediate response is needed.
1. Choose the current communication area
Section titled “1. Choose the current communication area”- Open Parents → Connect.
- Home provides the available school communication overview. Read the source and period of any archive figures; they are not current Communications delivery evidence.
- Choose Messages for School conversations and the current governed workflow.
- Read Configured communication channels: In-app, EMAIL, SMS and PUSH can be enabled or off. A channel’s presence does not establish an eligible endpoint for every family.
- Choose the available Inbox, Compose, Campaigns, Parent groups, Templates, Translations, Automation, Channel settings, Approvals, Delivery audit, Governance, Emergency or Connect archive tab for the intended job.
- Settings in the outer Connect navigation is separate from the managed Channel settings tab. Review the specific settings panel before changing preferences.
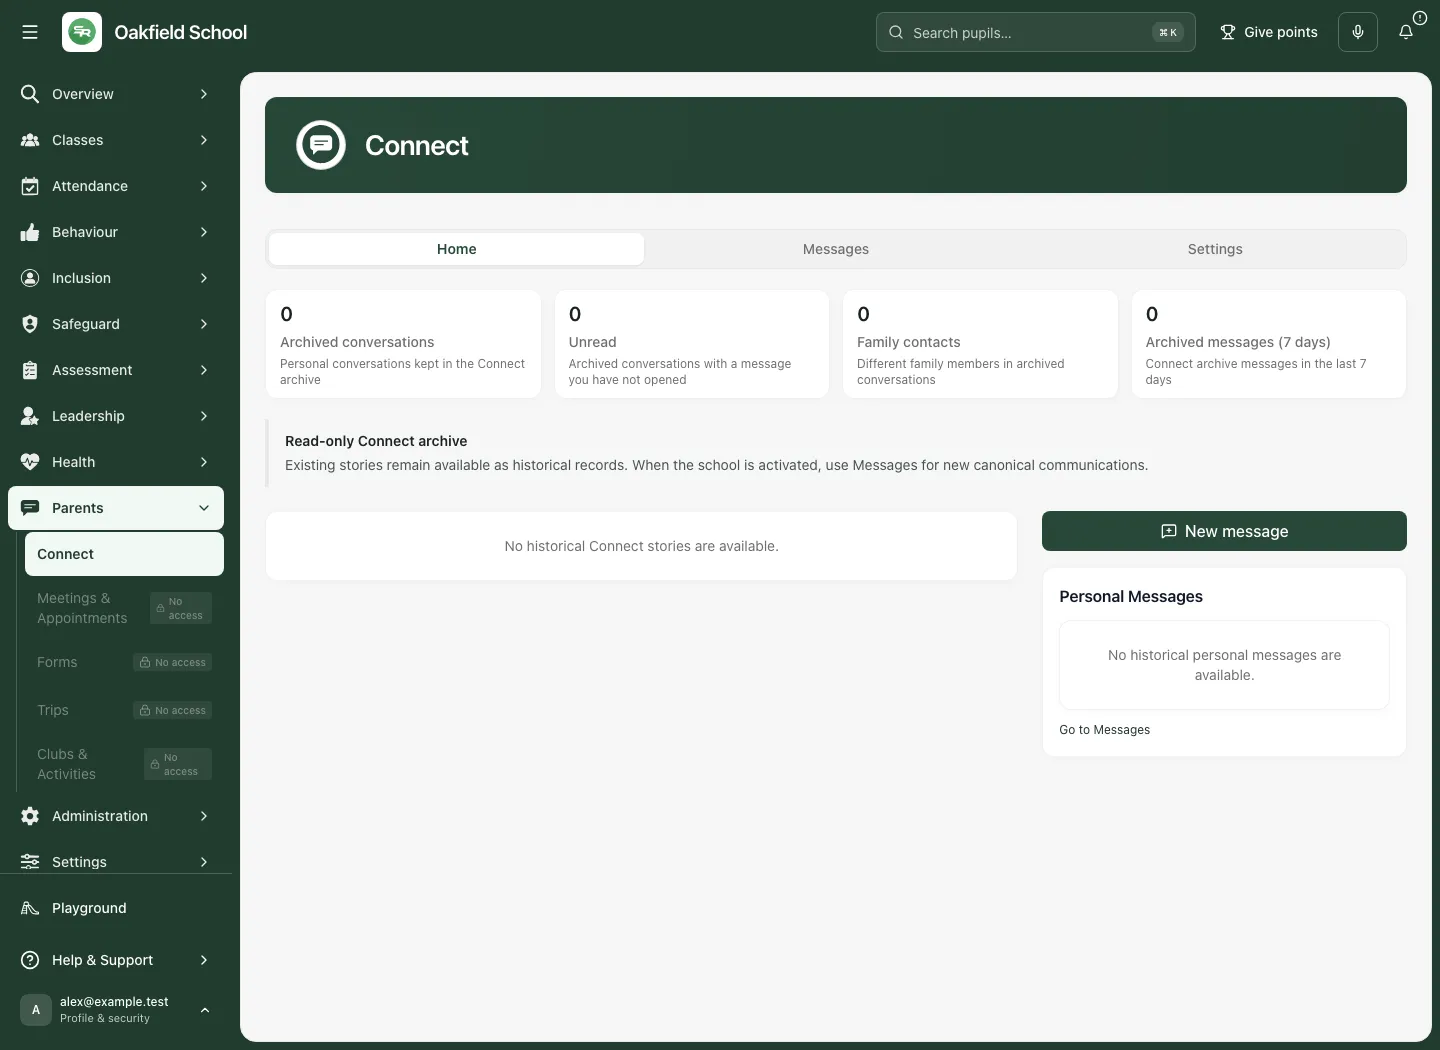
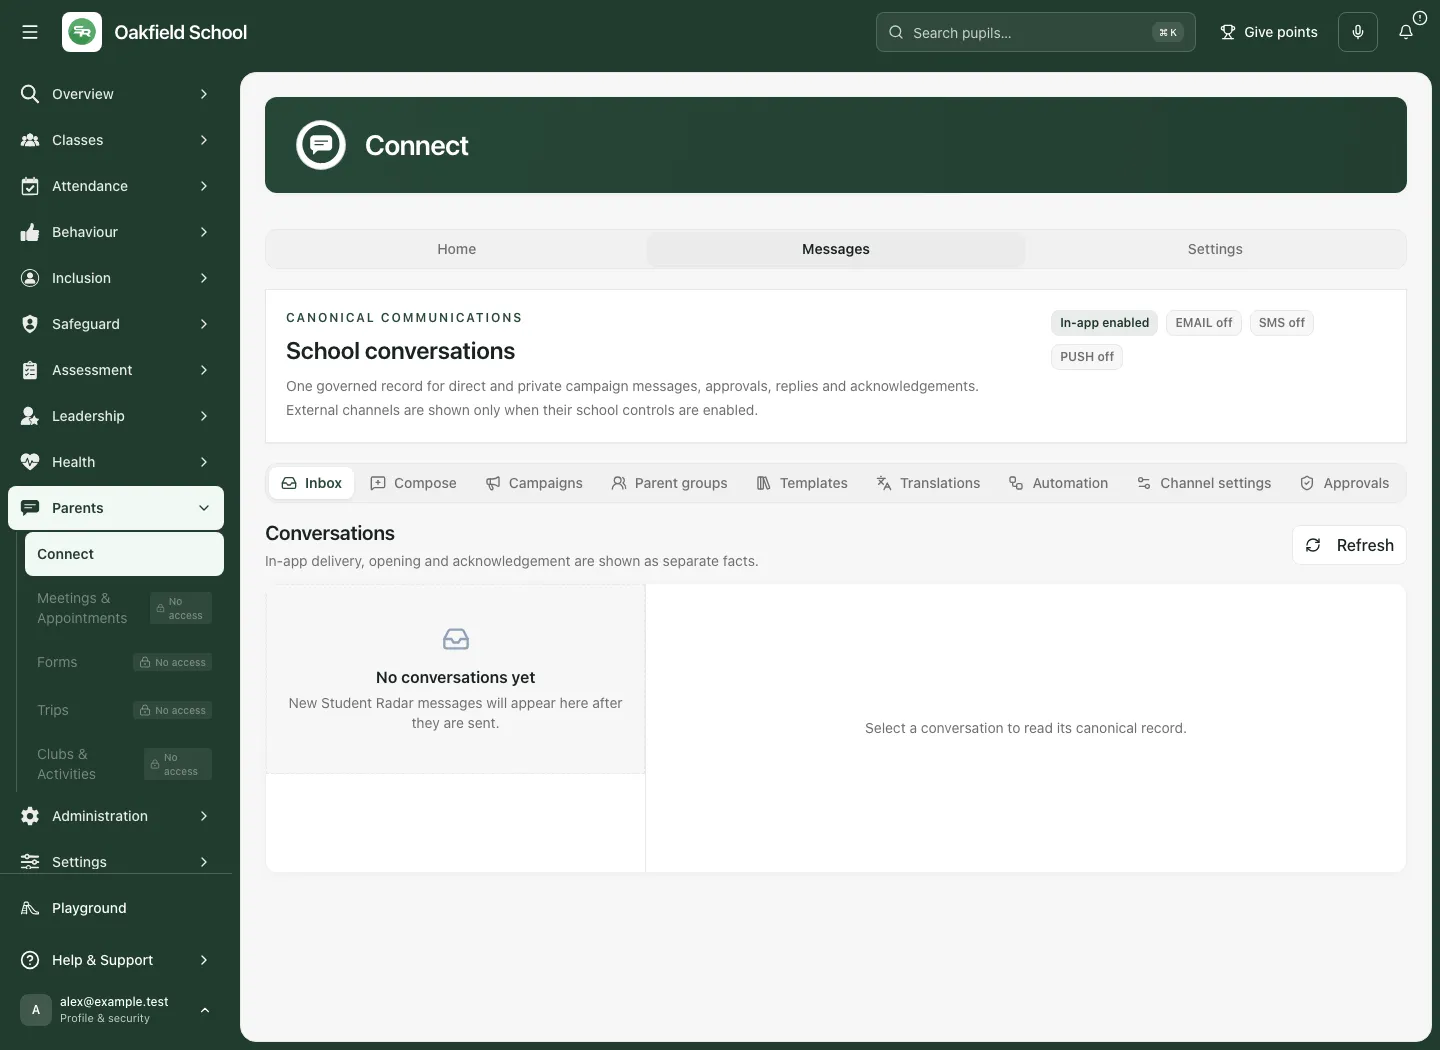
The Demo School can expose a read-only sample and a write-access prompt. It cannot create or deliver real messages. Explore the available records without treating sample access as proof of your school’s permissions.
2. Review the recipient before writing a direct message
Section titled “2. Review the recipient before writing a direct message”- Choose Messages → Compose.
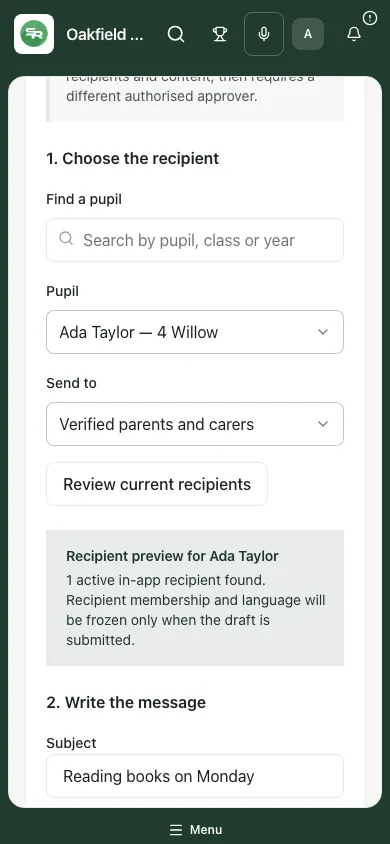
- Read the sensitive-message notice: manual messages freeze recipients and content, then require a different authorised approver.
- Use Find a pupil, then select Pupil, checking the name and class/year context.
- Choose Send to, such as Verified parents and carers, using the actual eligible recipient kind offered.
- Choose Review current recipients.
- Read Recipient preview for [pupil], the number of active in-app recipients, missing-recipient state and any language/translation requirement.
- If no eligible recipient is available, resolve the school relationship/account issue through the authorised process. A missing relationship is not corrected by guessing another endpoint.
- Changing the pupil or recipient kind clears the audience proof. Review the new recipients before writing/submitting against them.
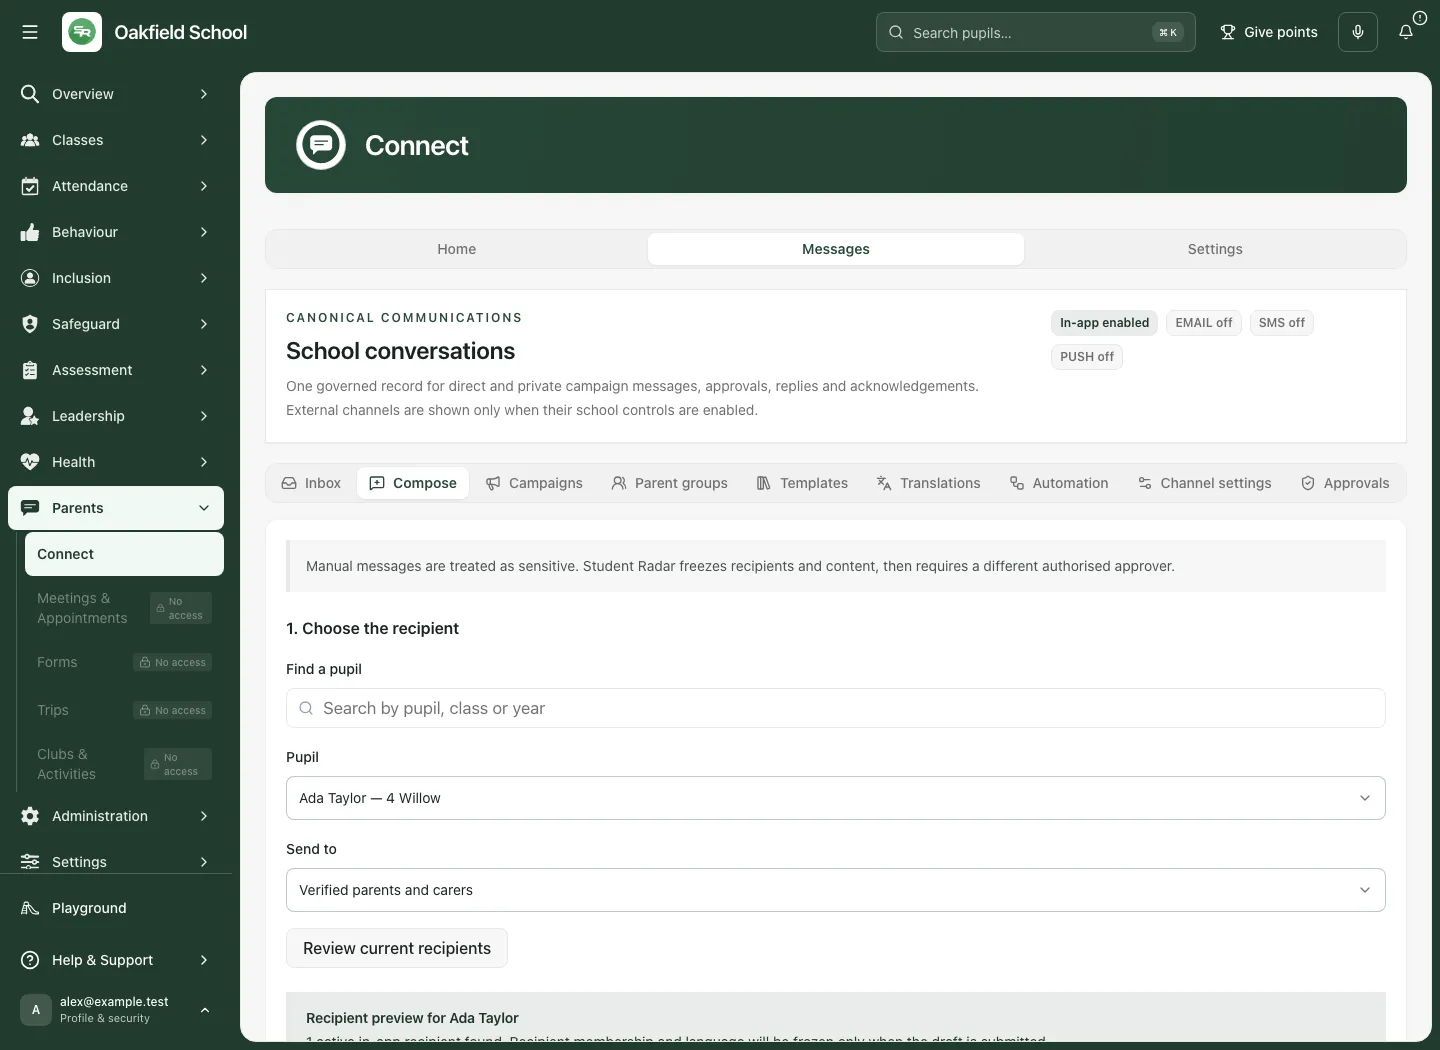
The preview is current information, not a permanent audience commitment. Recipient membership and language are frozen when the draft is submitted through the governed workflow.
3. Write the message and choose the intended response
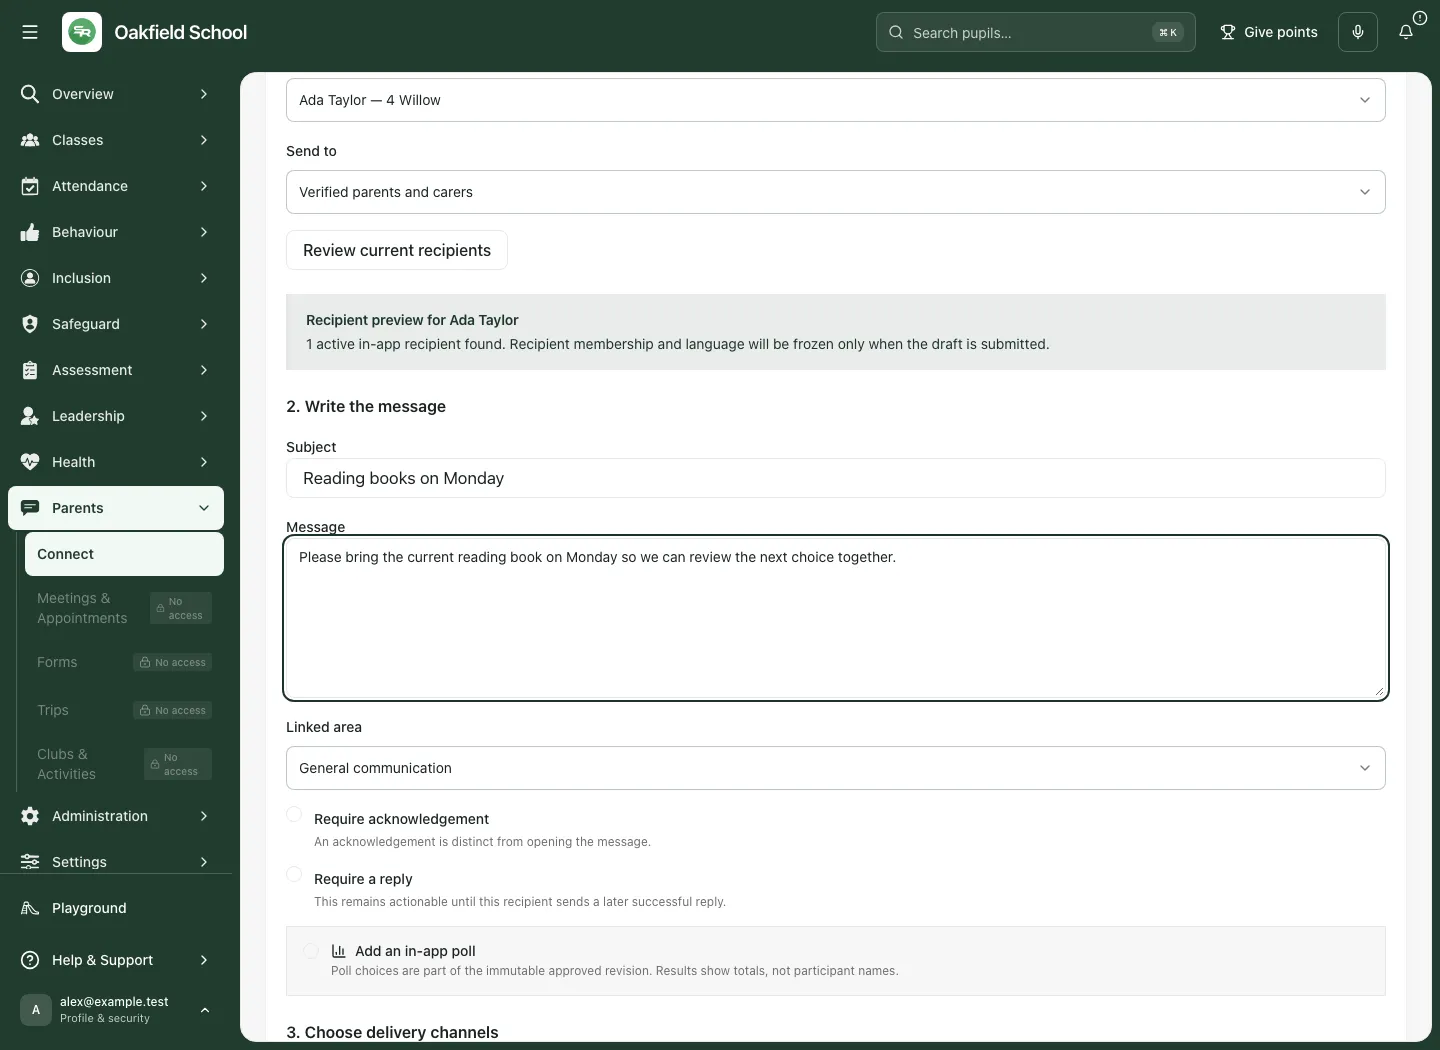
Section titled “3. Write the message and choose the intended response”- Enter Subject and Message with clear, proportionate content for the reviewed recipient.
- Choose Linked area when appropriate. It gives context; it does not disclose or grant access to a specialist record automatically.
- Select Require acknowledgement only when an explicit acknowledgement is needed. Opening a message and acknowledging it are different states.
- Select Require a reply when a later successful reply is needed. It remains actionable until that recipient supplies the required later reply; an old reply does not satisfy a newly requested response.
- If appropriate and available, select Add an in-app poll, enter Poll question and the options, choose Response type, and optionally Closing time (optional).
- Add/remove poll options using the offered controls and review them before submission. Poll choices form part of the approved revision; results show totals rather than participant names.
- Reread the whole message, recipient context and requested response. Do not treat a polished message as evidence that the underlying facts are verified.
4. Review delivery channels and attachments
Section titled “4. Review delivery channels and attachments”- Under Choose delivery channels, read the available audience/channel choices. The full governed message remains available in Student Radar; In-app is always included.
- Select only the configured external channels appropriate for the audience. Not configured for this school or Unavailable for this audience is not a failed delivery or an invitation to use an unapproved route.
- Read the audience and language implications before adding email, SMS or Web Push.
- Under Attach files safely, choose Choose attachments and select the intended files.
- The current message supports up to ten files and 25 MB total. Check the filename, size and content before upload.
- Files remain private in quarantine until the safety scan passes. Only clean files can be approved or downloaded. A selected/uploaded file is not automatically a clean approved attachment.
- Remove an unintended or failed attachment using the specific control and review the resulting clean revision before requesting approval.
5. Create the draft and request independent approval
Section titled “5. Create the draft and request independent approval”- Review the recipient proof, message, acknowledgement/reply/poll, selected channels, translations and clean attachments together.
- Choose Create draft and request approval.
- Wait for the actual draft/submission result. If the workflow pauses after a draft was created, continue the original draft rather than creating a competing message.
- Where a cleaned/revised draft is retained, use Request approval for clean revision as offered.
- Read the returned state, frozen recipient count and revision. A request awaiting approval has not been sent.
- If a request outcome is uncertain, follow the original-operation recovery instruction and inspect the current thread before repeating it.
- Editing approved content, audience, language or attachments can require a new revision and review. An earlier approval does not cover a changed message.
6. Review another person’s message in Approvals
Section titled “6. Review another person’s message in Approvals”- Open Approvals with the appropriate permission.
- Inspect the entire pending revision: original content, audience membership and inclusion reasons, channels, requested responses, translations and attachments.
- Verify it is appropriate to send and that the frozen audience matches the actual purpose. The author cannot replace the required independent approver.
- Choose Review and approve, read the confirmation naming the revision and frozen recipient count, then Confirm approval.
- Alternatively choose Reject with reason, enter Rejection reason, then Confirm rejection.
- Wait for the confirmed state. A stale revision, missing clean attachment or current authority change requires fresh review.
- Approval authorises that revision for its workflow; it does not itself prove dispatch or delivery.
7. Read the thread, send deliberately and follow responses
Section titled “7. Read the thread, send deliberately and follow responses”- Open Inbox and select the intended conversation. Read its title, child context, latest message and current state.
- Load earlier messages using the offered history controls when needed. A paged or failed history is not the complete thread.
- Read the exact current approved revision before using Send now where available.
- Sending queues delivery for each frozen recipient on the channels chosen for that revision. Wait for the actual returned state rather than treating a button click as delivered.
- Read acknowledgements, replies and any requested-response state separately from the message’s delivery status.
- For a pending message that should stop, use its cancellation control, read which unclaimed delivery jobs can still be cancelled and confirm deliberately. Already sent work remains in the audit record.
- Reply through the permitted thread controls and read the new reply’s actual outcome. Do not assume an unavailable reply result was sent.
- If a link opens a thread directly, confirm the intended source and current authority; the URL does not grant access.
8. Prepare a private campaign
Section titled “8. Prepare a private campaign”- Open Campaigns and choose the appropriate campaign composition route.
- Select the intended structural or supported dynamic audience and choose Send privately to and Review current audience.
- Read pupils, eligible recipient endpoints, distinct accounts, missing recipients and any translation requirement. These are different denominators.
- Enter Campaign title, Subject, Message and any required acknowledgement.
- Review channels and clean attachments, then choose Create draft and request approval, or Request approval for clean revision for the retained clean draft.
- Review the frozen audience and exact revision through the independent approval process before scheduling.
- For an approved eligible campaign, use Queue now or Schedule for later. For later sending, enter Send time in [school time zone] and choose Confirm schedule.
- Read the campaign’s actual scheduled/sending/delivery state. An approved or scheduled campaign is not proof it reached every account.
- To stop eligible unsent work, choose Cancel campaign, enter Cancellation reason and confirm. Cancellation stops only jobs the worker has not claimed; it does not retract delivered messages.
Private campaigns retain child-specific recipient records. They do not create a shared conversation revealing the campaign’s whole membership to recipients. Newsletter content, where offered, is part of the reviewed message revision and needs the same audience/content checks.
9. Manage an explicit opt-in parent group
Section titled “9. Manage an explicit opt-in parent group”- Open Parent groups and read the school structure and current eligibility.
- To create a supported shared group, choose School structure, enter Group title and review the eligible family scope.
- For an ordinary club requiring approval, complete Approval reason and use Approve ordinary club before the offered group creation path.
- Choose Create group and invite eligible parents only when the explicit opt-in process and audience are appropriate. This is a real invitation action, separate from a private campaign.
- Open the intended managed group and review Parent membership, invitations and opt-in states. Use Refresh eligibility when source membership has changed.
- Use Re-invite or Remove only for the intended membership and actual authority.
- For moderation, choose the specific action, read Confirm moderation action, enter Reason and choose Confirm action or Cancel.
- Review shared posts and their lifecycle before sending or scheduling. Use Cancel unsent work with its Cancellation reason where appropriate.
Shared parent groups are a different disclosure setting from private child-specific messages. Explain that distinction to the school before inviting families. Private reports and moderation records remain subject to their own access controls.
10. Maintain governed templates and translations
Section titled “10. Maintain governed templates and translations”Templates
Section titled “Templates”- Open Templates → New template, or select the intended saved template.
- Enter Template name, Stable key and Category, then Subject (optional) and Message.
- Use Verified variables and the offered Subject / Message insertion controls for supported fields; do not invent placeholders that have no approved source.
- Review Require translation review and the exact template version then choose Create immutable version 1 for a new template, or Create version [number] for an edited template.
- A changed template is a new version; current approved messages do not silently acquire the new content.
- For retirement use Archive template → Confirm archive, or Keep active to cancel. Restore template reopens the template lifecycle, not previously delivered messages.
Translations
Section titled “Translations”- Open Translations and select the intended message/template revision and target language.
- Compare the full original and proposed translation, including meaning, requested action and sensitive details.
- Review the complete Canonical English source and proposed translation. Use Review and approve → Confirm translation approval, or Reject translation, enter Translation rejection reason and choose Confirm translation rejection. An automatic translation remains a draft until the required independent review is completed.
- Recheck the exact message revision and recipient language before submission/dispatch. An earlier translation approval does not cover changed source text.
11. Review automation with human approval and source limits
Section titled “11. Review automation with human approval and source limits”- Open Automation and review the intended Whole-child domain, rule and source event.
- For a new rule, enter the offered Stable rule key, Staff-facing name, Internal event type, template version, recipient kind, requested channels and trigger condition. These are managed school configuration choices; use the approved school configuration rather than guessing keys.
- Review baseline/follow-up windows and the expected professional follow-up.
- Choose Save draft rule or Save immutable new version. Check the saved rule and its approved template version.
- Review the exact approved version before Activate. Use Pause, Revise or Archive deliberately as the school process requires.
- Inspect individual run states and source/template provenance. A suppressed or failed run is different from a draft created, and a draft created is different from a sent message. Where the run offers a draft editor, review Draft subject and Draft message, choose Save new revision for edits, then Submit for independent approval.
- Use specific retry/recovery controls only after checking the original run; do not duplicate a communication because a callback or delivery acknowledgement was uncertain.
Automation signals support human judgement. They do not diagnose a child, prove an outcome or grant access to restricted specialist facts.
12. Manage channels, delivery and emergency communication
Section titled “12. Manage channels, delivery and emergency communication”Channel settings
Section titled “Channel settings”Read school activation/readiness, verified sender identities, digest settings and any class-teacher send-policy controls. Configuring a sender or requested channel is separate from provider verification and actual delivery. Where offered, Request provider verification, inspect Refresh results, and use Make default only for the reviewed eligible sender. To retire one, enter Retirement reason and choose Confirm retire, or Keep sender to cancel.
Keep pupil/family preference, channel eligibility, quiet-hour behaviour and school policy separate. A school-enabled channel does not guarantee every family has an eligible endpoint or subscription.
Delivery audit and Governance
Section titled “Delivery audit and Governance”Open Delivery audit for the intended message/job and read its channel, recipient label, masked endpoint, revision, attempts, provider result and current resolution. Use Governance for the available operational coverage/readiness view. A provider message ID or accepted dispatch is not proof of human reading. Resolve the specific failed or uncertain delivery using the permitted controls, preserving the original audit trail and avoiding a blind resend.
Emergency
Section titled “Emergency”- Open Emergency only with the appropriate authority and actual operational purpose.
- Choose Pre-approved emergency template and Live emergency or Planned drill deliberately.
- Review the current whole-school audience and template/version, then choose Create governed emergency draft. Check the returned draft before proceeding.
- Enter Operational reason and the explicit confirmation text shown, then choose Dispatch across configured channels only for the intended live emergency or drill. This bypasses digest timing and quiet hours; a drill must remain described as a drill.
- Read the actual broadcast/delivery outcomes and follow the school’s direct emergency arrangements. Do not infer safety, attendance or receipt from a broadcast state.
- Cancellation stops only eligible unclaimed work; preserve delivered work and the operational audit record.
13. Keep the Connect archive distinct
Section titled “13. Keep the Connect archive distinct”Connect archive is the read-only legacy communication record. Read the displayed source and dates; an archive conversation or its historical metrics do not establish current Communications recipient, approval or delivery state. Use the current Compose and governed thread workflow for new messages.
14. Prepare on a phone
Section titled “14. Prepare on a phone”- Use Connect navigation to choose Home, Messages or Settings.
- Use the compact section control for the permitted message workspace.
- Review recipient proof, full content, channels and attachment state before the final action.
- Keep the device private and resolve the draft/discard prompt before leaving a sensitive message.
Troubleshooting and common questions
Section titled “Troubleshooting and common questions”| Situation | What to check |
|---|---|
| School context or availability unavailable | Retry/reload through the offered control; do not infer channels or permissions from an old snapshot. |
| Missing recipient | Resolve the trusted relationship/account through the school process; do not guess an address. |
| Body disabled | Select the pupil/recipient kind and Review current recipients first. |
| Waiting for approval | A different authorised approver must review the frozen revision. |
| Attachment cannot be approved | Read quarantine/scan state and use only the clean revision. |
| Changed content or recipient | Review the new revision and audience; prior approval may no longer apply. |
| Send result uncertain | Inspect/recover the original operation before another dispatch. |
| Message sent but no response | Delivery, reading, acknowledgement and reply are separate states. Follow the actual response requirement. |
| Channel unavailable | Check school configuration, verified sender and eligible endpoint/preferences. |
| Cancelled message already delivered | Cancellation cannot retract delivered work; use the school’s authorised correction/follow-up process. |
Can I approve my own sensitive message? The manual-message workflow requires a different authorised approver.
Does acknowledgement mean the family acted? No. It records the specific acknowledgement, not the outcome.
Does a private campaign reveal all families? It uses child-specific private recipient records; shared opt-in groups are a separate workflow with different disclosure expectations.
Does a link grant case access? No. Every restricted target checks current permission.
Where do class updates fit? See Families for the class workspace, and Parent Conversations for a factual record of a conversation that already happened. See Meetings & Appointments for appointment programmes and durable meeting records.