Prepare and receive a safeguarding record transfer
Written for: Authorised headteachers, DSLs and deputy DSLs.
Choose the child and destination, select records, authorise the pack and follow the recipient’s acceptance, download and import steps.
The workflow separates the pupil and recipient, selected records and summary, authorisation, a sealed pack, and the recipient’s acceptance or download route.
A draft is not a sealed pack. A sealed pack is not an offer, a downloaded pack is not an imported record, and an import is not proof that the receiving DSL has reviewed the child’s current needs. Plan and record the human handover and receipt confirmation too.
All examples are fictional. The screenshots show preparation and record views; no real pack was created, offered, released or imported.
Before you start
Section titled “Before you start”Check your school and authority. The access message identifies the headteacher, DSL and deputy DSL roles for record-transfer work; the current server decision governs what your account can do. Being a pupil’s teacher, knowing a reference or holding a case link does not grant transfer access.
Confirm the pupil, receiving school and named safeguarding contact through the school’s approved process. Review the actual record and restrictions before selecting material. Follow your school’s current transfer policy and professional guidance; the page’s checklist supports recording those decisions, it does not make them for you.
Never paste a download link into an open channel or include it in a public help request. An external-school link is a bearer download route: whoever holds it can use it. Its email label does not verify the person who uses it, and there is no separate passcode.
1. Read inbound and outbound work
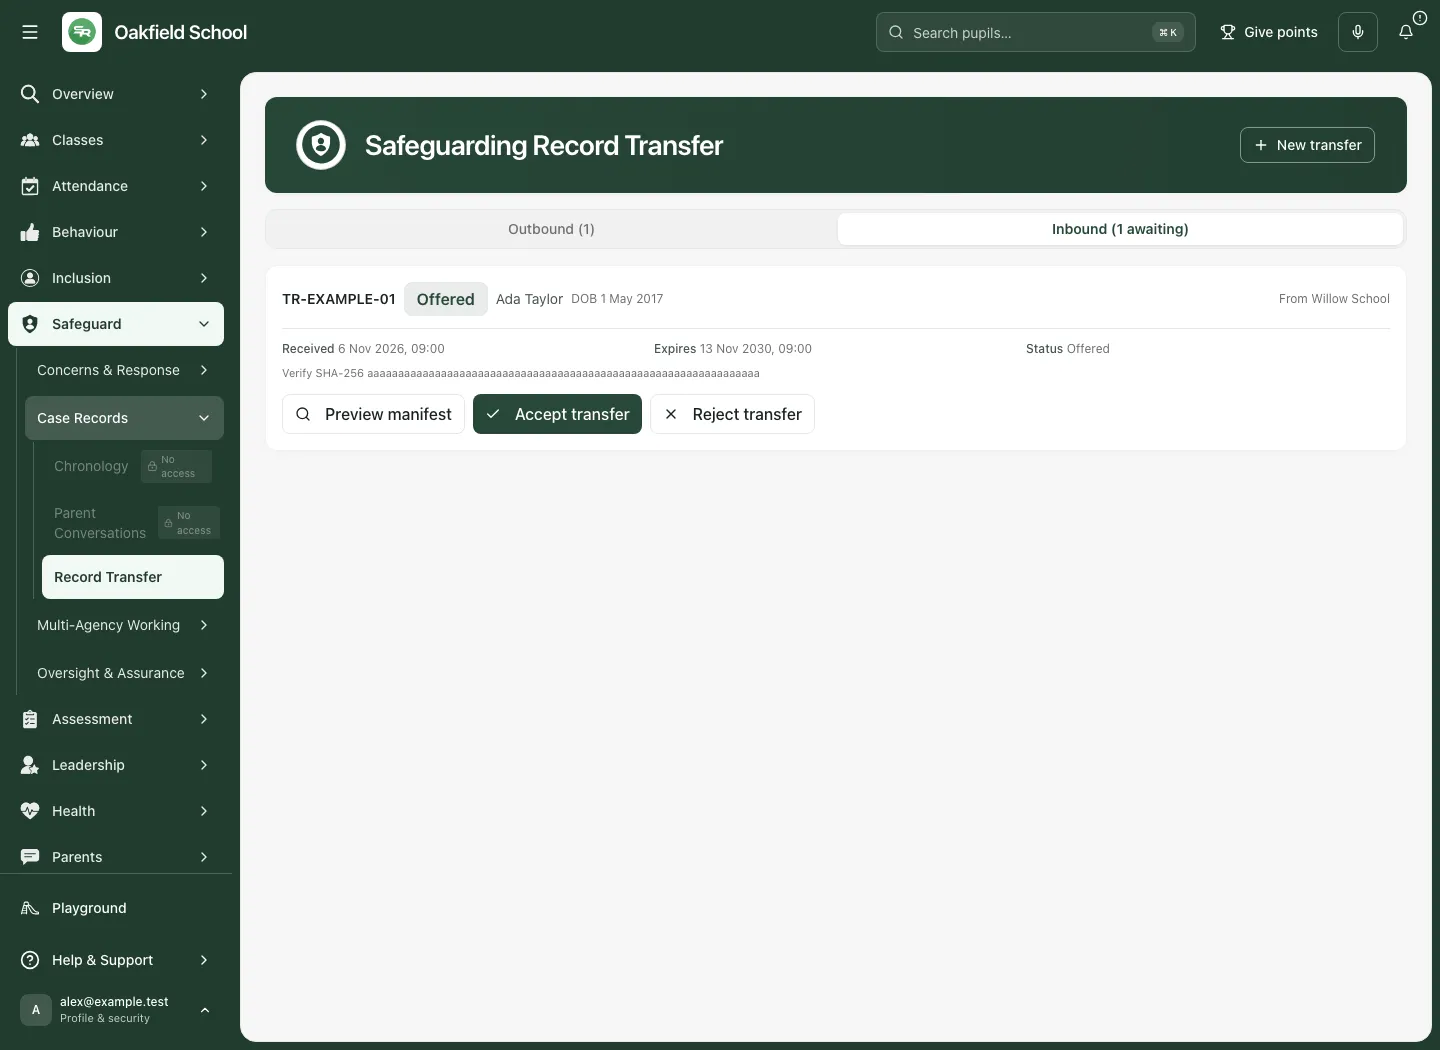
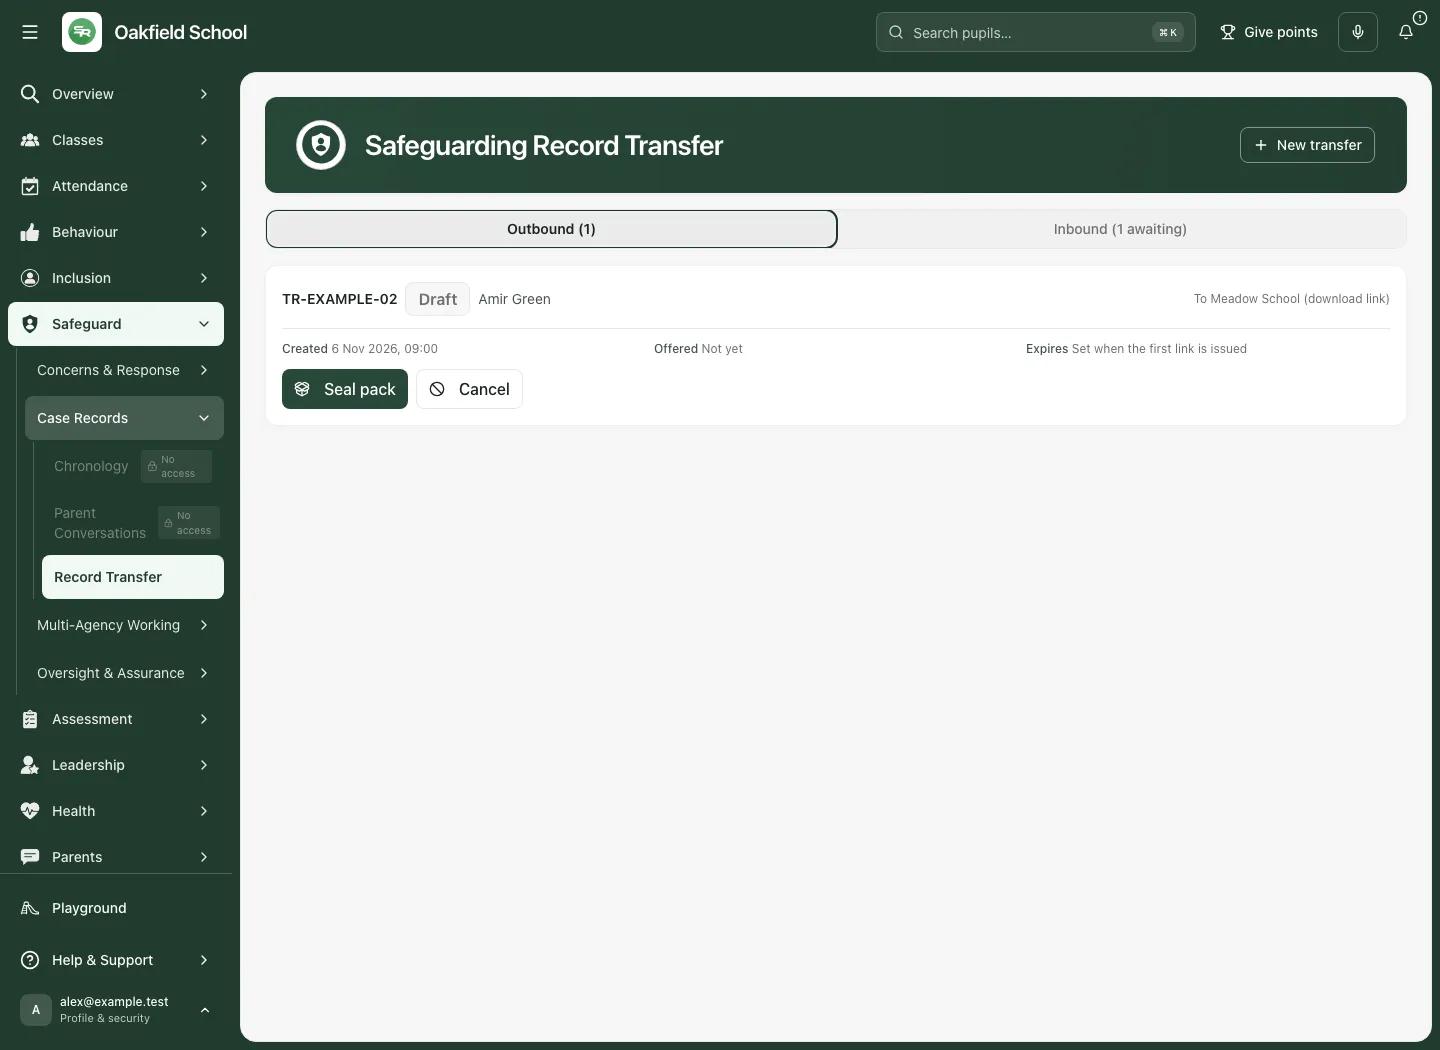
Section titled “1. Read inbound and outbound work”- Open Safeguard → Case Records → Record Transfer.
- In Safeguarding Record Transfer, choose Outbound for records sent by your school or Inbound for offers to it. An awaiting inbound offer can select that tab automatically.
- Read each transfer’s reference, person where permitted, source/destination, status and relevant dates.
- Keep unavailable list states distinct from an empty list. A failed read does not prove there are no transfers.
- Treat a passed offer window as expired even if an older displayed status has not yet been refreshed.
2. Start a new transfer and confirm the destination
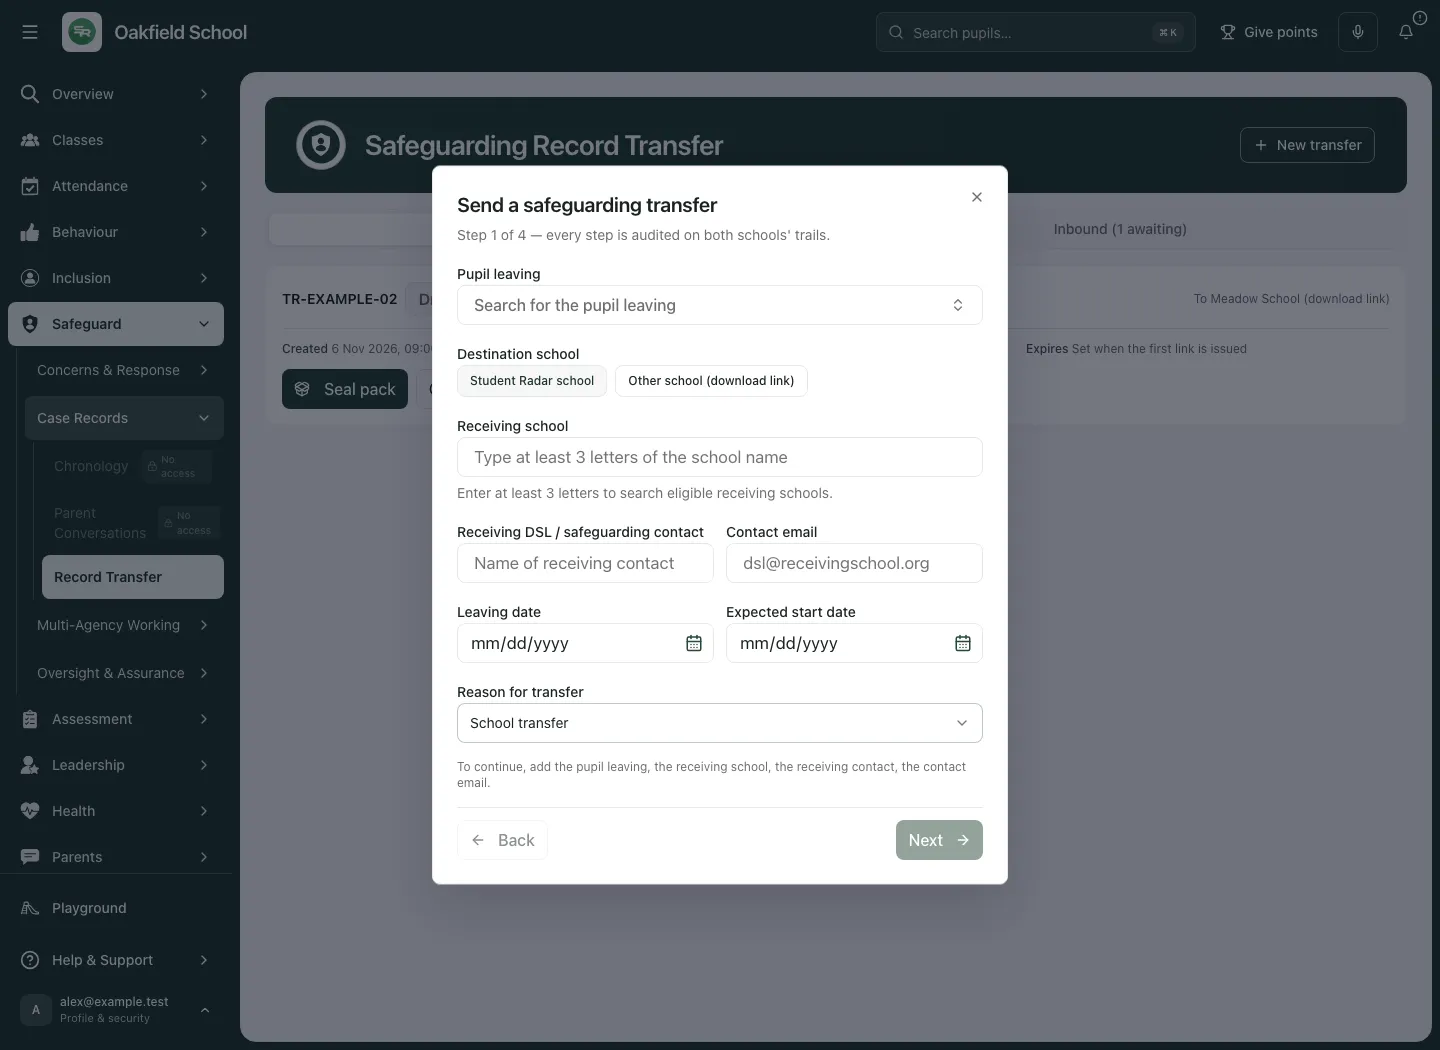
Section titled “2. Start a new transfer and confirm the destination”- Choose New transfer to open Send a safeguarding transfer. The dialog shows four steps.
- Under Pupil leaving, open the picker, type at least two characters and choose the intended pupil. Check the displayed identity; selecting a similar name is not sufficient.
- Choose Student Radar school or Other school (download link).
- For a Student Radar destination, enter at least three letters in Receiving school and select the intended eligible school result. Check its name and URN where shown. If there is no match, use Retry school search where offered or confirm the correct route; do not select another school to proceed.
- For an external destination, enter School name (at least three characters). Read the bearer-link explanation before continuing.
- Enter Receiving DSL / safeguarding contact and valid Contact email.
- Record Leaving date, Expected start date and Reason for transfer. The reasons offered are School transfer, Managed move / alternative provision, Permanent exclusion, Moved out of area, Phase transition (e.g. Y6 → Y7) and Other (including elective home education).
- Check the missing-information message beside Next. Complete the required recipient information and choose Next.
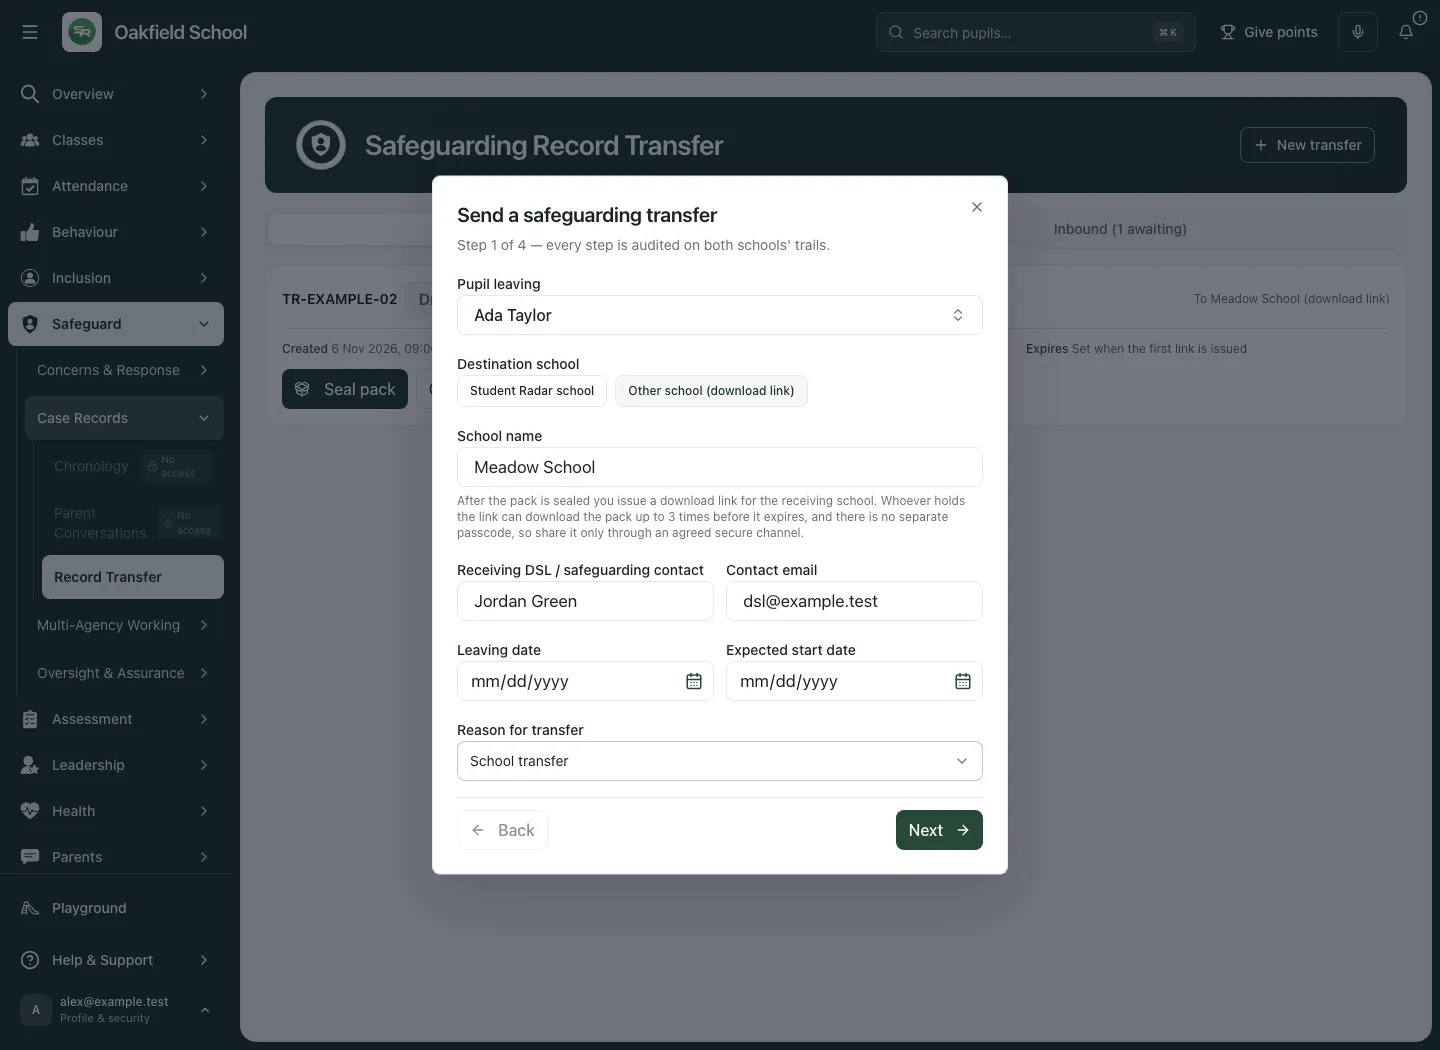
The receiving contact fields record the intended handover. They do not send an email, establish a contact relationship or authenticate an external downloader.
3. Choose records and write a structured summary
Section titled “3. Choose records and write a structured summary”- Wait for the selected pupil’s concern records to finish loading successfully. Do not proceed from an unavailable or still-loading record list.
- Under Records to include, check each concern’s reference, title, status and reported date/time. Select the appropriate records deliberately.
- Use an offered source preview to review the permitted concern before including it. Selecting a record does not override restrictions on its attachments or agency notes.
- The picker lists the newest 100 concern records, and a transfer supports at most 100. If the pupil has further history, resolve the intended scope with the authorised lead rather than claiming the selection is exhaustive.
- Read the no-selection message if nothing is selected. The pack then carries pupil details and the structured transfer summary only; it is not the full safeguarding file.
- Under KCSIE 2026 transfer checklist, confirm only what has actually been planned or checked: the CP file transfer within five school days of the move; a separate transfer from the main pupil file; receipt confirmation requested and recorded; and a summary separating current concerns from historic context.
- Write Current concerns and live risks and Historic context, each at least 20 and up to 2,000 characters. Keep current professional concerns distinct from relevant background.
- Add Immediate actions / plan (optional) and Receipt confirmation plan (optional) where useful, each within the displayed limits. Name the intended handover, review or confirmation arrangement clearly.
- Read the pack-section explanation. Chronology, actions/outcomes, worry-box reports and other material are included where linked to the selected concerns. Body-map and attachment manifests do not remove file access controls.
- Confirm I have checked restricted attachments and agency notes before including them only after that review.
- Choose Legal basis for the transfer from the offered KCSIE transfer duty (CP file follows the child) or Consent recorded, using the school’s authorised decision. Add Note (optional) when needed, up to 1,000 characters.
- Check the missing-information message and choose Next when the required record checks and summaries are complete.
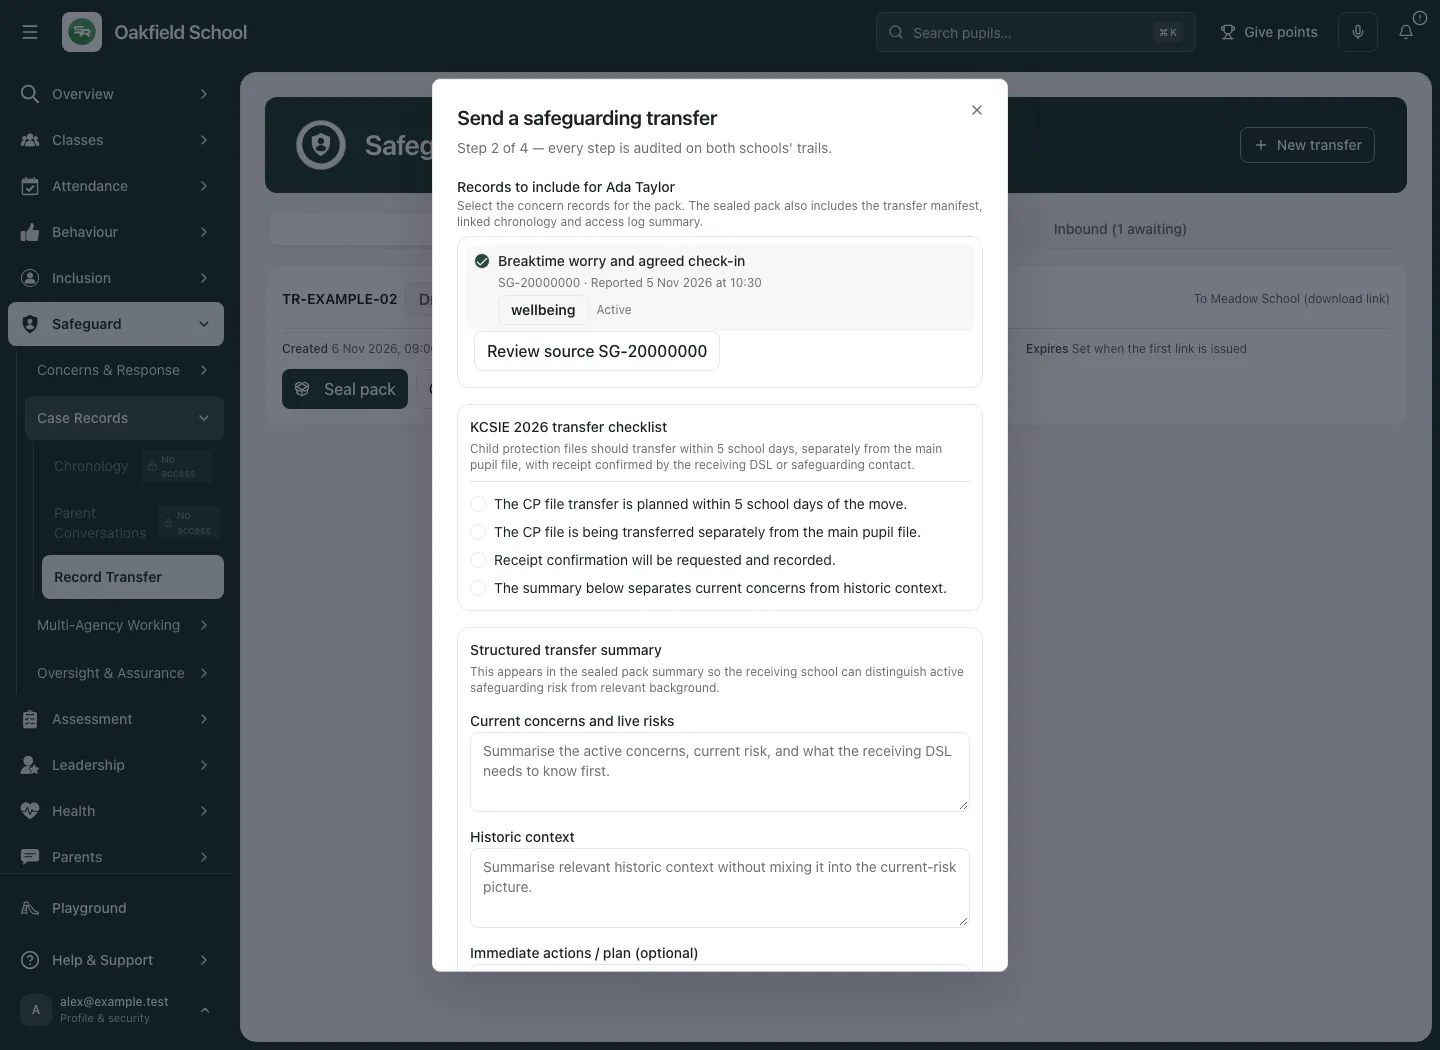
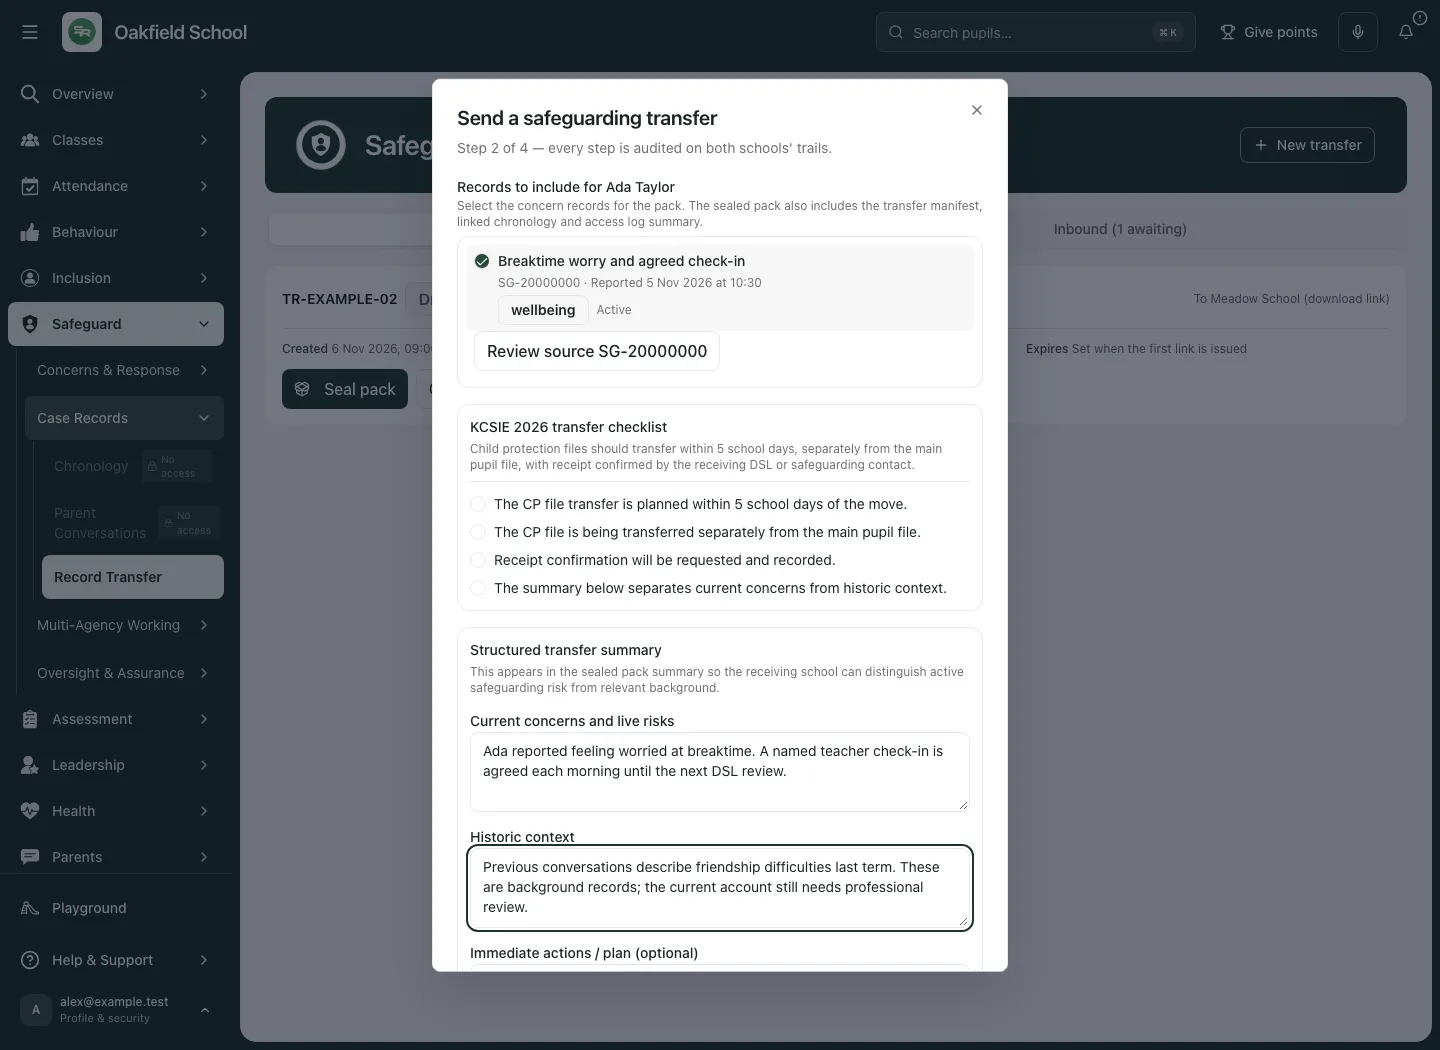
The section names describe possible pack content. They do not promise that every source item or file has been selected, included or made accessible. Review the selected scope and actual pack result.
4. Authorise and create the secure transfer
Section titled “4. Authorise and create the secure transfer”- In Confirm recipient and access controls, read the named recipient and destination again.
- Check whether the route requires inbound acceptance or a later external download link.
- Read the access rules: private storage, authorised time-limited release, the offer window, download limits, expiry and revocation.
- Confirm I confirm this transfer is appropriate and authorised only after the professional and recipient checks are complete.
- Choose Create secure transfer. This creates the transfer and builds its pack; it is a deliberate recorded action, not a preview.
- Wait for the returned reference and build result. If the pack is not successfully sealed, use the returned error and current outbound state rather than assuming completion.
- A draft that still needs building can offer Seal pack on its outbound card. Use that existing draft’s operation after checking its scope; avoid creating a second transfer merely because a build failed.
The sealed summary is bounded. If text exceeds the supported pack envelope, shorten it thoughtfully while preserving the required factual distinction and record references; do not silently omit material needed for the receiving lead’s decision.
5. Offer a sealed pack to a Student Radar school
Section titled “5. Offer a sealed pack to a Student Radar school”- Check the final transfer reference, pupil and selected destination.
- Choose Offer to [school name] in the last wizard step, or the available offer control on the outbound card.
- Wait for the recorded offer state. The receiving school then has its own inbound acceptance workflow.
- Monitor the actual status and offer expiry. The shown access rules give a 14-day acceptance window.
- Arrange and record the human safeguarding handover and receipt confirmation through the approved school process. An offer or acceptance is not proof of a completed review of the record.
6. Issue an external-school download link
Section titled “6. Issue an external-school download link”After creating the external transfer, Done returns to the outbound list; it does not issue or send a link.
- On the correct sealed external transfer, choose Issue link.
- In Issue a download link, check This link is for: reference, pupil and school.
- Enter Receiving DSL email (audit trail). This is a recipient label, not authentication of the person using the link.
- Choose Issue link and wait for the confirmed result.
- In Download link for [reference], choose Copy link. The URL is shown only once. Confirm it was copied before closing.
- Share it through the agreed secure channel to the verified receiving contact. Issuing or copying the link does not send it automatically.
- Read its actual expiry. Links expire after 72 hours or when the transfer’s offer window ends, whichever is sooner; a link permits up to three downloads and may be revoked earlier.
- Opening the landing page shows the summary; a release is used when the recipient presses Download. Do not use an extra download merely to test a real recipient’s link.
- Check the card’s link list for recipient labels, expiry, download usage and revoked state. Download usage does not establish who read the file.
If you close without copying, or a link result cannot be confirmed, use Revoke on any new unwanted link shown on that transfer card and issue a new one only when the intended state is clear. Do not keep issuing competing links after an uncertain response.
7. Receive and inspect an inbound transfer
Section titled “7. Receive and inspect an inbound transfer”- Choose Inbound and find the intended reference and sending school.
- Read pupil availability. Awaiting a unique pupil match. Pupil and pack details are unavailable is a blocked match, not permission to guess a child. Resolve the school’s underlying identity/matching process.
- For a matched row, choose Preview manifest.
- In Transfer manifest, check Pupil, Sending school, Received and Integrity check. Compare the supplied SHA-256 integrity information according to the school’s process; a checksum alone does not establish the professional accuracy of the contents.
- If appropriate and authorised, choose Accept transfer. Wait for the accepted state.
- If the offer should not be accepted, choose Reject transfer, review the confirmation, add Reason (optional) within its limit and confirm Reject transfer. Do not reject simply to hide an unresolved identity problem without following the school’s process.
8. Download and import accepted records
Section titled “8. Download and import accepted records”- On the accepted matched transfer, choose Download pack.
- Read the actual download result. The pack opens in a new tab; if the browser blocks it, follow the presented guidance rather than treating “prepared” as a file you received.
- Review the downloaded pack, provenance, integrity and selected scope securely.
- When the matched transfer is in its downloaded state, choose Import into pupil record if that is the authorised next step.
- Wait for the actual result. Not imported yet: awaiting a pupil match is not a completed import. Selected source imported or Existing import confirmed describes the returned source-import state.
- Follow the offered route to the DSL Action Board to review imported records in their source context. Imported source material does not automatically establish a new local safeguarding decision or assign a response.
- Confirm receipt and handover separately with the sending lead, using the school’s approved process.
An import retry retains its original intent within the same active context. After an uncertain result, recover or confirm that original import rather than creating a parallel import. A school or account change requires a fresh read before further action.
9. Cancel or reissue deliberately
Section titled “9. Cancel or reissue deliberately”Cancel
Section titled “Cancel”- Select Cancel on the intended outbound transfer when available.
- Read Cancel transfer [reference]? and its consequences. Cancellation is final.
- Choose Keep transfer to stop or Cancel transfer to proceed.
- Wait for the result and confirm the state. Follow up with the intended recipient if a handover was already arranged; cancellation does not erase a previously downloaded copy.
Reissue
Section titled “Reissue”- Use Reissue on an eligible expired transfer.
- Read Reissue [reference]? and confirm only after rechecking the intended pupil, recipient and current need.
- The workflow creates a new draft linked to the previous transfer, seals it and, for a Student Radar school, offers it. Read the result of each step.
- For an external school, issue a new link from the new sealed card. An old expired link is not renewed by assuming the new pack exists.
- If reissue is not finished, inspect the new and original cards and the error before retrying. Preserve the lineage and avoid a competing transfer.
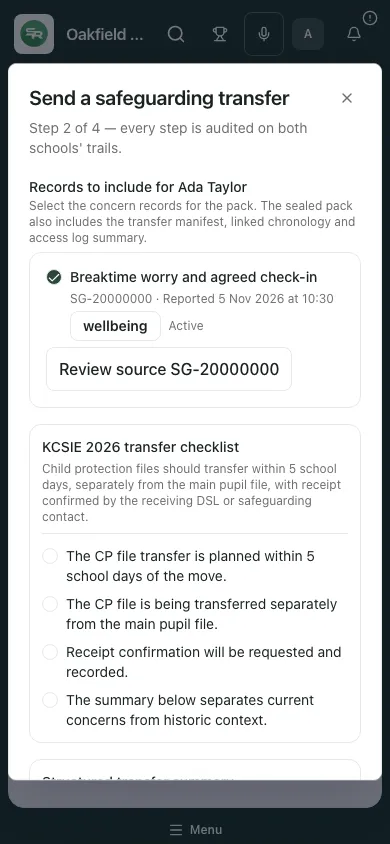
10. Review on a phone
Section titled “10. Review on a phone”- Read the transfer identity before opening its controls.
- Scroll within the wizard to review required fields and checklist items. The step’s missing-information message explains what still blocks Next.
- Keep current concerns and historic context distinct on the smaller screen too.
- Keep the device private and complete the authorised final action only after checking the full recipient and scope.
Troubleshooting
Section titled “Troubleshooting”| Situation | What to do |
|---|---|
| Account cannot view transfers | Use the school’s authorised headteacher/DSL/deputy DSL process. A case link does not grant transfer access. |
| Receiving school does not appear | Search at least three letters, retry if offered and verify eligibility/identity; choose the actual external route if appropriate. |
| Next is disabled | Read the explicit missing information, record-load state, four checklist confirmations, summaries and restricted-record check. |
| Concern list unavailable | Retry or resolve the source read. Do not seal a guessed empty scope. |
| Unique pupil match missing | Resolve identity through the authorised school process. Do not import into a guessed pupil. |
| Pack build fails | Inspect the current draft and use its build/retry path rather than creating a duplicate. |
| Link was lost or issue result uncertain | Review the card’s link list and revoke the unwanted link before a deliberate replacement. |
| Download tab blocked | Follow the returned browser guidance. A prepared download is not a file received. |
| Import outcome uncertain | Confirm the original import intent and source result before repeating. |
| Offer expired | Review whether reissue is appropriate; expiry is not acceptance or receipt. |
Frequently asked questions
Section titled “Frequently asked questions”Can an external school use the transfer? The external route issues a limited bearer download link. It does not require a Student Radar account and does not authenticate the downloader through its email label.
Does the pack contain every record and file automatically? No. It reflects the selected concerns and supported linked sources, with manifests and access boundaries. Review actual scope.
Does accepting mean importing? No. Acceptance, download and import are separate states and actions.
Can I recover a one-time displayed URL from the card later? The URL is shown once. If lost, revoke that link and issue an appropriate replacement after checking the state.
Does cancellation recall a copy already downloaded? No. Handle any recipient follow-up through the school’s approved arrangements.
Where do authorised leads review the case next? Use the DSL Action Board and Chronology as permitted. New concerns use Raise Concern.